USA/GLOBAL: +1-949-461-9292
EUROPE: +39-011-3052-794
CONTACT US

Dynamic Mechanical Analysis of Cork Using Nanoindentation

DYNAMIC MECHANICAL ANALYSIS

OF CORK USING NANOINDENTATION

Prepared by

FRANK LIU

INTRODUCTION

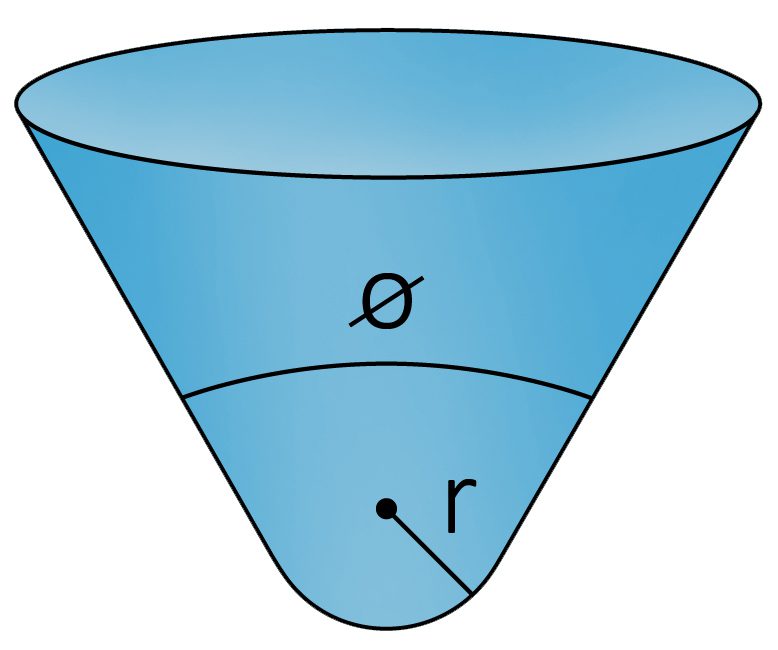
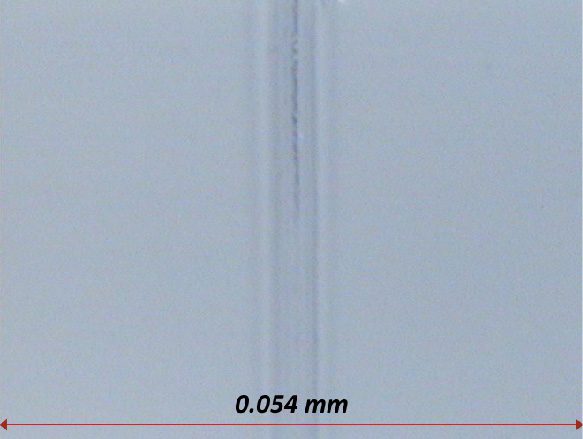
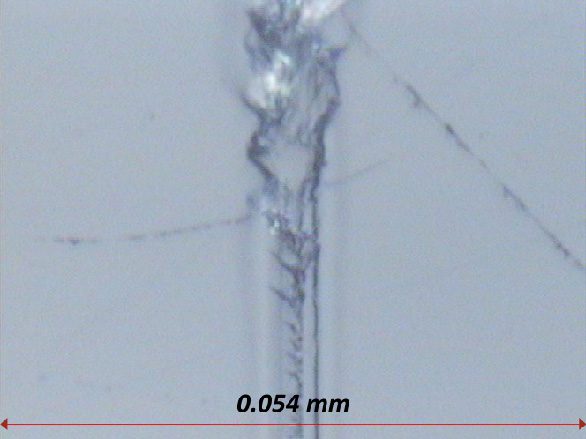
Dynamic Mechanical Analysis (DMA) is a powerful technique used to investigate the mechanical properties of materials. In this application, we focus on the analysis of cork, a widely used material in wine sealing and aging processes. Cork, obtained from the bark of the Quercus suber oak tree, exhibits distinct cellular structures that provide mechanical properties resembling synthetic polymers. In one axis, the cork has honeycomb structure. The two other axes are structured in multiple rectangular-like prisms. This gives cork different mechanical properties depending on the orientation being tested.

IMPORTANCE OF DYNAMIC MECHANICAL ANALYSIS (DMA) TESTING IN ASSESSING CORK MECHANICAL PROPERTIES

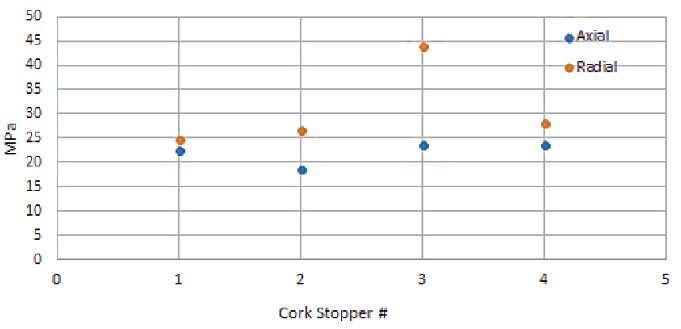
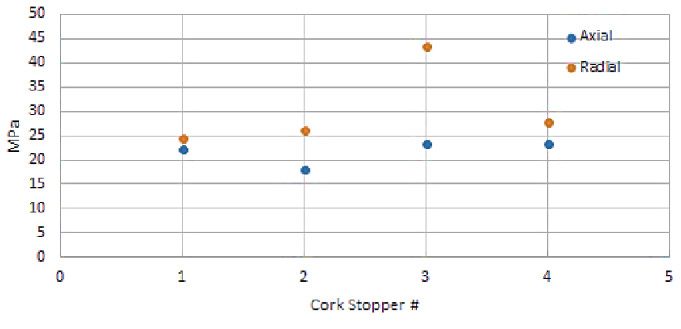
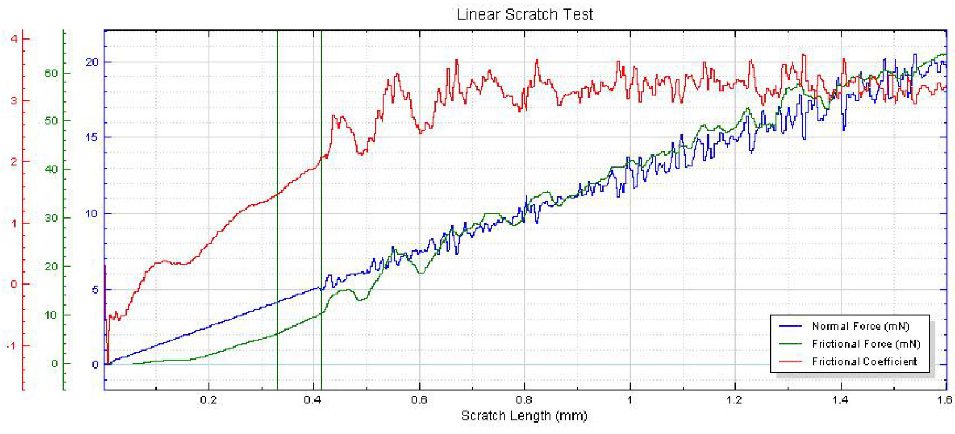
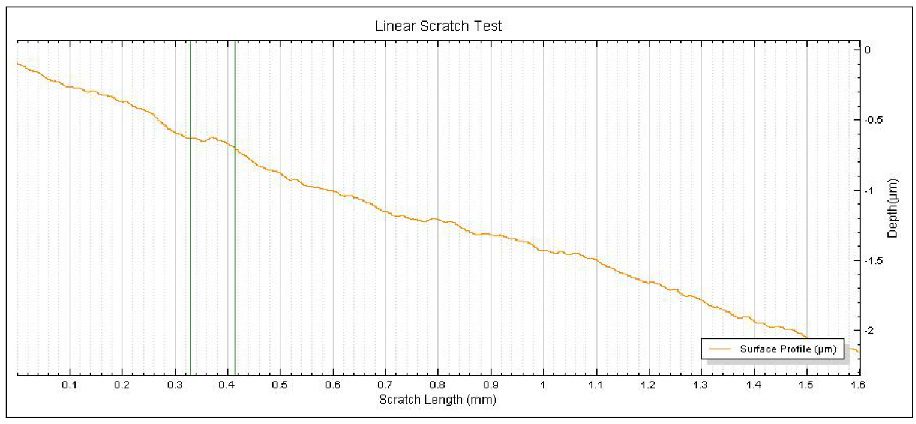
The quality of corks greatly relies on their mechanical and physical properties, which are crucial for their effectiveness in wine sealing. Key factors determining cork quality include flexibility, insulation, resilience, and impermeability to gas and liquids. By utilizing dynamic mechanical analysis (DMA) testing, we can quantitatively assess the flexibility and resilience properties of corks, providing a reliable method for evaluation.

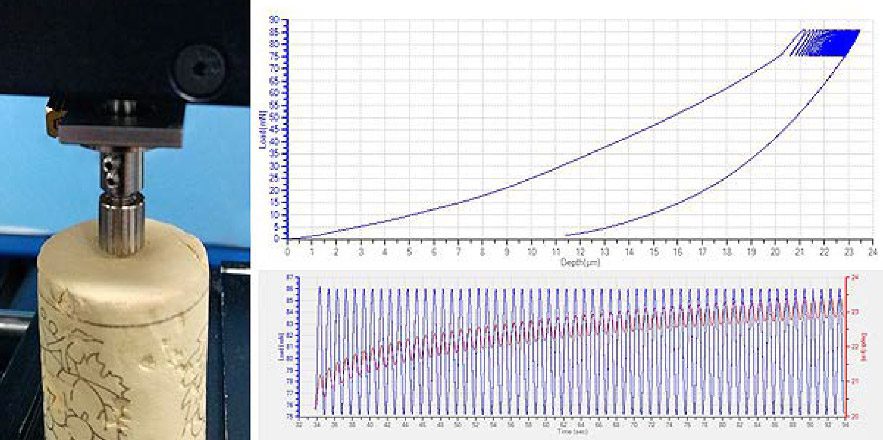
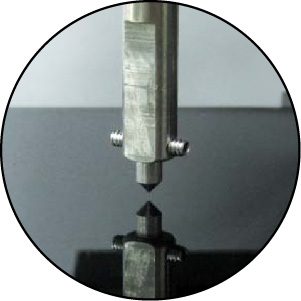
The NANOVEA PB1000 Mechanical Tester in the Nanoindentation mode enables the characterization of these properties, specifically Young’s modulus, storage modulus, loss modulus, and tan delta (tan (δ)). DMA testing also allows for the collection of valuable data on phase shift, hardness, stress, and strain of the cork material. Through these comprehensive analyses, we gain deeper insights into the mechanical behavior of corks and their suitability for wine sealing applications.

MEASUREMENT OBJECTIVE

In this study, perform dynamic mechanical analysis (DMA) on four cork stoppers using the NANOVEA PB1000 Mechanical Tester in the Nanoindentation mode. The quality of the cork stoppers is labeled as: 1 – Flor, 2 – First, 3 – Colmated, 4 – Synthetic rubber. DMA indentation tests were conducted in both the axial and radial directions for each cork stopper. By analyzing the mechanical response of the cork stoppers, we aimed to gain insights into their dynamic behavior and evaluate their performance under different orientations.

NANOVEA

PB1000

TEST PARAMETERS

MAX FORCE75 mN
LOADING RATE150 mN/min
UNLOADING RATE150 mN/min
AMPLITUDE5 mN
FREQUENCY1 Hz
CREEP60 s

indenter type

Ball

51200 Steel

3 mm Diameter

RESULTS

In the tables and graphs below, the Young’s modulus, storage modulus, loss modulus, and tan delta are compared between each sample and orientation.

Young’s modulus: Stiffness; high values indicate stiff, low values indicate flexible.

Storage modulus: Elastic response; energy stored in the material.

Loss modulus: Viscous response; energy lost due to heat.

Tan (δ): Dampening; high values indicate more dampening.

AXIAL ORIENTATION

StopperYOUNG’S MODULUSSTORAGE MODULUSLOSS MODULUSTAN
#(MPa)(MPa)(MPa)(δ)
122.567522.272093.6249470.162964
218.5466418.271533.1623490.17409
323.7538123.472673.6178190.154592
423.697223.580642.3470080.099539


RADIAL ORIENTATION

StopperYOUNG’S MODULUSSTORAGE MODULUSLOSS MODULUSTAN
#(MPa)(MPa)(MPa)(δ)
124.7886324.565423.3082240.134865
226.6661426.317394.2862160.163006
344.0786743.614266.3659790.146033
428.0475127.941482.4359780.087173

YOUNG’S MODULUS

STORAGE MODULUS

LOSS MODULUS

TAN DELTA

Between cork stoppers, the Young’s modulus is not very different when tested in the axial orientation. Only Stopper #2 and #3 showed an apparent difference in the Young’s modulus between the radial and axial direction. As a result, the storage modulus and loss modulus will also be higher in the radial direction than in the axial direction. Stopper #4 shows similar characteristics with the natural cork stoppers, except in the loss modulus. This is quite interesting since it means the natural corks has a more viscous property than the synthetic rubber material.

CONCLUSION

The NANOVEA Mechanical Tester in the Nano Scratch Tester mode allows simulation of many real-life failures of paint coatings and hard coats. By applying increasing loads in a controlled and closely monitored manner, the instrument allows to identify at what load failures occur. This can then be used as a way to determine quantitative values for scratch resistance. The coating tested, with no weathering, is known to have a first crack at about 22 mN. With values closer to 5 mN, it is clear that the 7 year lap has degraded the paint.

Compensating for the original profile allows to obtain corrected depth during the scratch and also to measure the residual depth after the scratch. This gives extra information on the plastic versus elastic behavior of the coating under increasing load. Both cracking and the information on deformation can be of great use for improving the hard coat. The very small standard deviations also show the reproducibility of the technique of the instrument which can help manufacturers improved the quality of their hard coat/paint and study weathering effects.

NOW, LET'S TALK ABOUT YOUR APPLICATION

Nano Scratch & Mar Testing of Paint on Metal Substrate

Nano Scratch & Mar Testing

of Paint on Metal Substrate

Prepared by

SUSANA CABELLO

INTRODUCTION

Paint with or without hard coat is one of the most commonly used coatings. We see it on cars, on walls, on appliances and virtually anything that needs some protective coatings or simply for aesthetic purposes. The paints that are meant for the protection of the underlying substrate often have chemicals that prevent the paint from catching on fire or simply that prevent it from losing its color or cracking. Often the paint used for aesthetic purposes comes in various colors, but may not be necessarily meant for the protection of its substrate or for a long lifetime.

Nevertheless, all paint suffers some weathering over time. Weathering on paint can often change the properties from what the makers intended it to have. It can chip quicker, peel off with heat, loose color or crack. The different property changes of paint over time is why makers offer such a wide selection. Paints are tailored to meet different requirements for individual clients.

IMPORTANCE OF NANO SCRATCH TESTING FOR QUALITY CONTROL

A major concern for paint makers is the ability for their product to withstand cracking. Once paint begins to crack, it fails to protect the substrate that it was applied on; therefore, failing to satisfy their client. For example, if a branch happens to stroke the side of a car and immediately after the paint begins to chip off the makers of the paint would lose business due to their poor quality of paint. The quality of the paint is very important because if the metal under the paint becomes exposed it may begin to rust or corrode due to its new exposure.


Reasons like this apply to several other spectrums such as household and office supplies and electronics, toys, research tools and more. Although the paint may be resistant to cracking when they first apply it to metal coatings, the properties may change over time when some weathering has occurred on the sample. This is why it’s very important to have the paint samples tested at their weathered stage. Although cracking under a high load of stress may be inevitable, the maker must predict how weakening the changes may be over time and how deep the affecting scratch must be in order to provide their consumers with the best possible products.

MEASUREMENT OBJECTIVE

We must simulate the process of scratching in a controlled and monitored manner to observe sample behavior effects. In this application, the NANOVEA PB1000 Mechanical Tester in Nano Scratch Testing mode is used to measure the load required to cause failure to an approximately 7 year old 30-50 μm thick paint sample on a metal substrate.

A 2 μm diamond tipped stylus is used at a progressive load ranging from 0.015 mN to 20.00 mN to scratch the coating. We performed a pre and post scan of the paint with 0.2 mN load in order to determine the value for the true depth of the scratch. The true depth analyzes the plastic and elastic deformation of the sample during testing; whereas, the post-scan only analyzes the plastic deformation of the scratch. The point where the coating fails by cracking is taken as the point of failure. We used the ASTMD7187 as a guide to determine our testing parameters.


We can conclude that having used a weathered sample; therefore, testing a paint sample at its weaker stage, presented us with lower points of failure.


Five tests were performed on this sample in order to

determine the exact failure critical loads.

NANOVEA

PB1000

TEST PARAMETERS

following ASTM D7027

The surface of a Roughness Standard was scanned using a NANOVEA ST400 equipped with a high-speed sensor that generates a bright line of 192 points, as shown in FIGURE 1. These 192 points scan the sample surface at the same time, leading to significantly increased scan speed.

LOAD TYPE Progressive
INITIAL LOAD 0.015 mN
FINAL LOAD 20 mN
LOADING RATE 20 mN/min
SCRATCH LENGTH 1.6 mm
SCRATCH SPEED, dx/dt 1.601 mm/min
PRE-SCAN LOAD 0.2 mN
POST-SCAN LOAD 0.2 mN
Conical Indenter 90° Cone 2 µm tip radius

indenter type

Conical

Diamond 90° Cone

2 µm tip radius

Conical Indenter Diamond 90° Cone 2 µm tip radius

RESULTS

This section presents the data collected on the failures during the scratch test. The first section describes the failures observed in the scratch and defines the critical loads that were reported. The next part contains a summary table of the critical loads for all samples, and a graphical representation. The last part presents detailed results for each sample: the critical loads for each scratch, micrographs of each failure, and the graph of the test.

FAILURES OBSERVED AND DEFINITION OF CRITICAL LOADS

CRITICAL FAILURE:

INITIAL DAMAGE

This is the first point at which the damage is observed along the scratch track.

nano scratch critical failure initial damage

CRITICAL FAILURE:

COMPLETE DAMAGE

At this point, the damage is more significant where the paint is chipping and cracking along the scratch track.

nano scratch critical failure complete damage

DETAILED RESULTS

* Failure values taken at point of substrate cracking.

CRITICAL LOADS
SCRATCH INITIAL DAMAGE [mN] COMPLETE DAMAGE [µm]
1 14.513 4.932
2 3.895 4.838
3 3.917 4.930
AVERAGE 3.988 4.900
STD DEV 0.143 0.054
Micrograph of Full Scratch from nano scratch test(1000x magnification).

FIGURE 2: Micrograph of Full Scratch (1000x magnification).

Micrograph of Initial Damage from nano scratch test (1000x magnification)

FIGURE 3: Micrograph of Initial Damage (1000x magnification).

Micrograph of Complete Damage from nano scratch test (1000x magnification).

FIGURE 4: Micrograph of Complete Damage (1000x magnification).

Linear Nano Scratch Test Friction Force and Coefficient of Friction

FIGURE 5: Friction Force and Coefficient of Friction.

Linear Nano Scratch Surface Profile

FIGURE 6: Surface Profile.

Linear Nano Scratch Test True Depth and Residual Depth

FIGURE 7: True Depth and Residual Depth.

CONCLUSION

The NANOVEA Mechanical Tester in the Nano Scratch Tester mode allows the simulation of many real-life failures of paint coatings and hard coats. By applying increasing loads in a controlled and closely monitored manner, the instrument allows to identify at what load failures occur. This can then be used as a way to determine quantitative values for scratch resistance. The coating tested, with no weathering, is known to have a first crack at about 22 mN. With values closer to 5 mN, it is clear that the 7 year lap has degraded the paint.

Compensating for the original profile allows obtaining corrected depth during the scratch and measuring the residual depth after the scratch. This gives extra information on the plastic versus elastic behavior of the coating under increasing load. Both cracking and the information on deformation can be of great use for improving the hard coat. The very small standard deviations also show the reproducibility of the instrument’s technique which can help manufacturers improve the quality of their hard coat/paint and study weathering effects.

NOW, LET'S TALK ABOUT YOUR APPLICATION

Roughness Mapping Inspection using 3D Profilometry

ROUGHNESS MAPPING INSPECTION

USING 3D PROFILOMETRY

Prepared by

DUANJIE, PhD

INTRODUCTION

Surface roughness and texture are critical factors that impact the final quality and performance of a product. A thorough understanding of surface roughness, texture, and consistency is essential for selecting the best processing and control measures. Fast, quantifiable, and reliable inline inspection of product surfaces is in need to identify the defective products in time and optimize production line conditions.

IMPORTANCE OF 3D NON-CONTACT PROFILOMETER FOR IN-LINE SURFACE INSPECTION

Surface defects in products result from materials processing and product manufacturing. Inline surface quality inspection ensures the tightest quality control of the end products. NANOVEA 3D Non-Contact Optical Profilers utilize Chromatic Light technology with unique capability to determine the roughness of a sample without contact. The line sensor enables scanning of the 3D profile of a large surface at a high speed. The roughness threshold, calculated in real-time by the analysis software, serves as a fast and reliable pass/fail tool.

MEASUREMENT OBJECTIVE

In this study, the NANOVEA ST400 equipped with a high-speed sensor is used to inspect the surface of a Teflon sample with defect to showcase the capability of NANOVEA

Non-Contact Profilometers in providing fast and reliable surface inspection in a production line.

NANOVEA

ST400

RESULTS & DISCUSSION

3D Surface Analysis of the Roughness Standard Sample

The surface of a Roughness Standard was scanned using a NANOVEA ST400 equipped with a high-speed sensor that generates a bright line of 192 points, as shown in FIGURE 1. These 192 points scan the sample surface at the same time, leading to significantly increased scan speed.

FIGURE 2 shows false color views of the Surface Height Map and Roughness Distribution Map of the Roughness Standard Sample. In FIGURE 2a, the Roughness Standard exhibits a slightly slanted surface as represented by the varied color gradient in each of the standard roughness blocks. In FIGURE 2b, homogeneous roughness distribution is shown in different roughness blocks, the color of which represents the roughness in the blocks.

FIGURE 3 shows the examples of the Pass/Fail Maps generated by the Analysis Software based on different Roughness Thresholds. The roughness blocks are highlighted in red when their surface roughness is above a certain set threshold value. This provides a tool for the user to set up a roughness threshold to determine the quality of a sample surface finish.

FIGURE 1: Optical line sensor scanning on the Roughness Standard sample

a. Surface Height Map:

b. Roughness Map:

FIGURE 2: False color views of the Surface Height Map and Roughness Distribution Map of the Roughness Standard Sample.

FIGURE 3: Pass/Fail Map based on the Roughness Threshold.

Surface Inspection of a Teflon Sample with Defects

Surface Height Map, Roughness Distribution Map and Pass/Fail Roughness Threshold Map of the Teflon sample surface are shown in FIGURE 4. The Teflon Sample has a ridge form at the right center of the sample as shown in the Surface Height Map.

a. Surface Height Map:

The different colors in the pallet of FIGURE 4b represents the roughness value on the local surface. The Roughness Map exhibits a homogeneous roughness in the intact area of the Teflon sample. However, the defects, in the forms of an indented ring and a wear scar are highlighted in bright color. The user can easily set up a Pass/Fail roughness threshold to locate the surface defects as shown in FIGURE 4c. Such a tool allows users to monitor in situ the product surface quality in the production line and discover defective products in time. The real-time roughness value is calculated and recorded as the products pass by the in-line optical sensor, which can serve as a fast but reliable tool for quality control.

b. Roughness Map:

c. Pass/Fail Roughness Threshold Map:

FIGURE 4: Surface Height Map, Roughness Distribution Map and Pass/Fail Roughness Threshold Map of the Teflon sample surface.

CONCLUSION

In this application, we have shown how the NANOVEA ST400 3D Non-Contact Optical Profiler equipped with an optical line sensor works as a reliable quality control tool in an effective and efficient manner.

The optical line sensor generates a bright line of 192 points that scan the sample surface at the same time, leading to significantly increased scan speed. It can be installed in the production line to monitor the surface roughness of the products in situ. The roughness threshold works as a dependable criteria to determine the surface quality of the products, allowing users to notice the defective products in time.

The data shown here represents only a portion of the calculations available in the analysis software. NANOVEA Profilometers measure virtually any surface in fields including Semiconductor, Microelectronics, Solar, Fiber Optics, Automotive, Aerospace, Metallurgy, Machining, Coatings, Pharmaceutical, Biomedical, Environmental and many others.

NOW, LET'S TALK ABOUT YOUR APPLICATION