Category: Application Notes

Self Cleaning Glass Coating Friction Measurement
Self cleaning glass coating possesses a low surface energy that repels both water and oils. Such a coating creates an easy-clean and non-stick glass surface that protects it against grime, dirt and staining. The easy-clean coating substantially cuts the water and energy usage on glass cleaning. It does not require harsh and toxic chemical detergents, making it an eco-friendly choice for a wide variety of residential and commercial applications, such as mirrors, shower glasses, windows and windshields.
Corrosion Effect On Hardness Using Nanoindentation
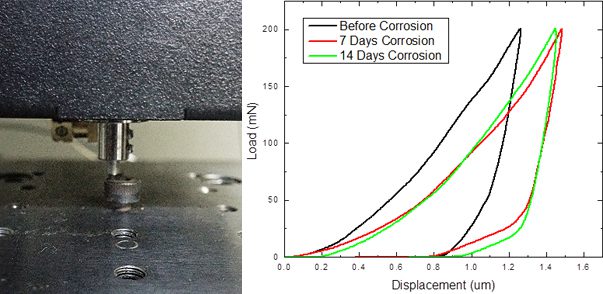
The mechanical properties of materials deteriorate during the corrosion process. For example, lepidocrocite (γ-FeOOH) and goethite (α-FeOOH) form in the atmospheric corrosion of carbon steel. Their loose and porous nature results in absorption of moisture and in turn further acceleration of the corrosion process. Akaganeite (β-FeOOH), another form of iron
oxyhydroxide, is generated on the steel surface in chloride containing environments. Nanoindentation can control the indentation depth in the range of nanometers and microns, making it possible to quantitatively measure the hardness and Young’s modulus of the corrosion products formed on the metal surface. It provides physicochemical insight in corrosion mechanisms involved so as to select the best candidate material for the target applications.
Drywall Texture & Pitting Using 3D Profilometry
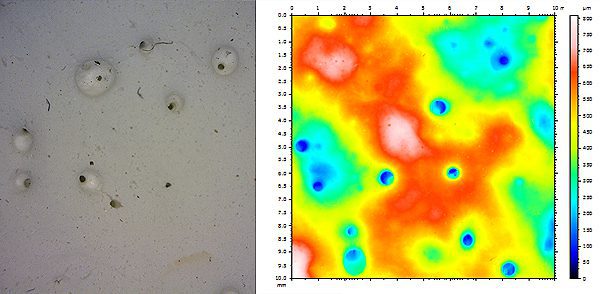
Drywall texture and roughness is critical in the final products quality and appearance. A better understanding of the effect of surface texture and consistency on the moisture resistance of the coated drywall allows selecting the finest product and optimizing the painting technique to obtain the best result. Quantifiable, fast and reliable surface inspection of the coating surface is in need for quantitative evaluation of the surface quality. The Nanovea 3D Non-Contact Profilometers utilizes chromatic confocal technology with unique capability to precisely measure the sample surface. The line-sensor technique can finish scanning a large drywall surface in minutes.
Cyclical Nanoindentation Stress-Strain Measurement
Machining Finish Quality Using 3D Profilometry
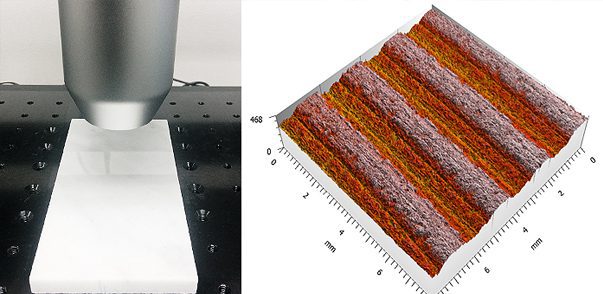
Machining finish is a result of different cutting techniques exhibiting different surface features. Flatness, roughness and texture of a cut/machined surface is vital to its end use. Accurate clean cut reduces the further work on grinding and rough edge removal. For example, when marble tiles are manufactured, inaccurate and rough cutting may lead to mismatch during the tile floor installation. Quantitative measurement of the surface texture, consistency, roughness and others is critical in improving the cutting/machining processing and quality control measures.

Grooved Stent Coating Failure Using Nano Scratch Testing
Drug–eluting stent is a novel approach in stent technology. It possesses a biodegradable and biocompatible polymer coating that releases medicine slowly and continuously at the local artery to inhibit intimal thickening and prevent the artery from being blocked again. One of the major concerns is the delamination of the polymer coating that carries the drug-eluting layer from the metal stent substrate. In order to improve the adhesion of this coating to the substrate, the stent is designed in different shapes. Specifically in this study, the polymer coating locates at the bottom of the groove on the mesh wire, which brings enormous challenge to the adhesion measurement. A reliable technique is in need to quantitatively measure the interfacial strength between the polymer coating and the metal substrate. The special shape and the small diameter of the stent mesh (comparable to a human hair) require ultrafine X-Y lateral accuracy to locate the test position and proper control and measurement of the load and depth during the test.

Tribology Inspection of Titanium Nitride Coatings By Tribometer
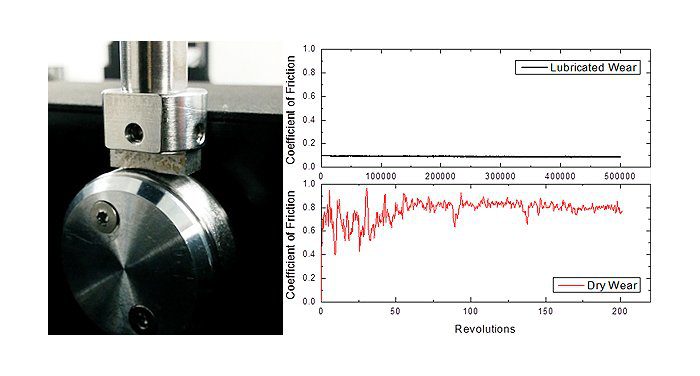
Wear of the tools in service creates loss of dimensions and functionality of the tools. It has significant influence on the tool life, as well as the surface integrity and dimension accuracy of the finished products. The tribo-mechanical properties of the protective ceramic coatings can substantially enhance the service performance and lifespan of the machine tools. Reliable and accurate tribology inspection of such protective coatings becomes vital to ensure quality performance of the tools.
Block on Ring Tribometer Option
Block on Ring test is a widely used technique that evaluates the sliding wear behaviors of materials in different simulated conditions, allows reliable ranking of material couples for specific tribological applications. Sliding wear often involves complex wear mechanisms taking place at the contact surface, such as adhesion wear, two-body abrasion, three-body abrasion and fatigue wear. The wear behavior of materials is significantly influenced by the work environment, such as normal loading, speed, corrosion and lubrication. A versatile tribometer that can simulate the different realistic work conditions will be ideal for wear evaluation.
Compression Set Measurement With 3D Profilometry
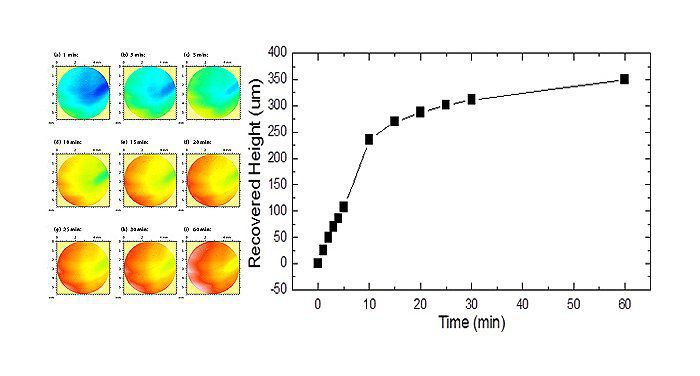
Compression set measurement of rubbers progressively recover their shape after the compressive stress is removed. Accurate in situ monitoring of the shape evolution during the compression set period can provide important insight into the mechanism of material recovery. Moreover, real-time monitoring of surface morphologies is very useful in various materials applications, such as paint drying and 3D printing. The Nanovea 3D Non-Contact Profilometers measure the surface morphology of materials without touching the sample, avoiding introducing additional scratches or shape alteration which may be caused by contact technologies such as sliding stylus.
https://nanovea.com/App-Notes/compression-set-measurement.pdf
Controlled Humidity Nanoindentation of Polymer Films
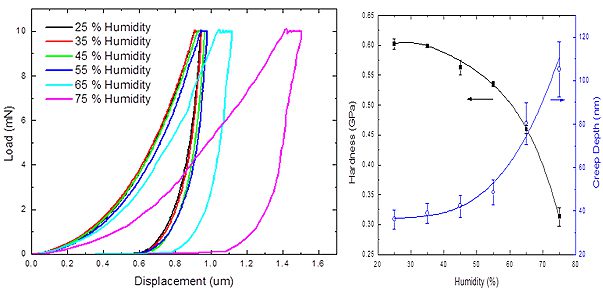
The mechanical properties of polymer is modified as the environmental humidity elevates. Transient moisture effects, a.k.a. mechano-sorptive effects arises as the polymer absorbs high moisture content and experiences accelerated creep behavior. The higher creep compliance is a result of complex combined effects such as increased molecular mobility, sorption-induced physical aging and sorption-induced stress gradients.
Therefore, a reliable and quantitative test (Humidity Nanoindentation)of the sorption-induced influence on the mechanical behavior of polymeric materials at different moisture level is in need. The Nano module of the Nanovea Mechanical Tester applies the load by a high-precision piezo and directly measures the evolution of force and displacement. Uniform humidity is created surrounding the indentation tip and the sample surface by an isolation enclosure, which ensures measurement accuracy and minimizes the influence of drift caused by humidity gradient.


