INTRODUCTION
Viscoelastic materials are characterized as having both viscous and elastic material properties. These materials are subject to time-dependent stress decrease (stress ‘relaxation’) under constant strain, leading to a significant loss of initial contact force. Stress relaxation is dependent on the type of material, texture, temperature, initial stress, and time. Understanding stress relaxation is critical in selecting optimal materials that have the strength and flexibility (relaxation) required for specific applications.
Importance of Stress Relaxation Measurement
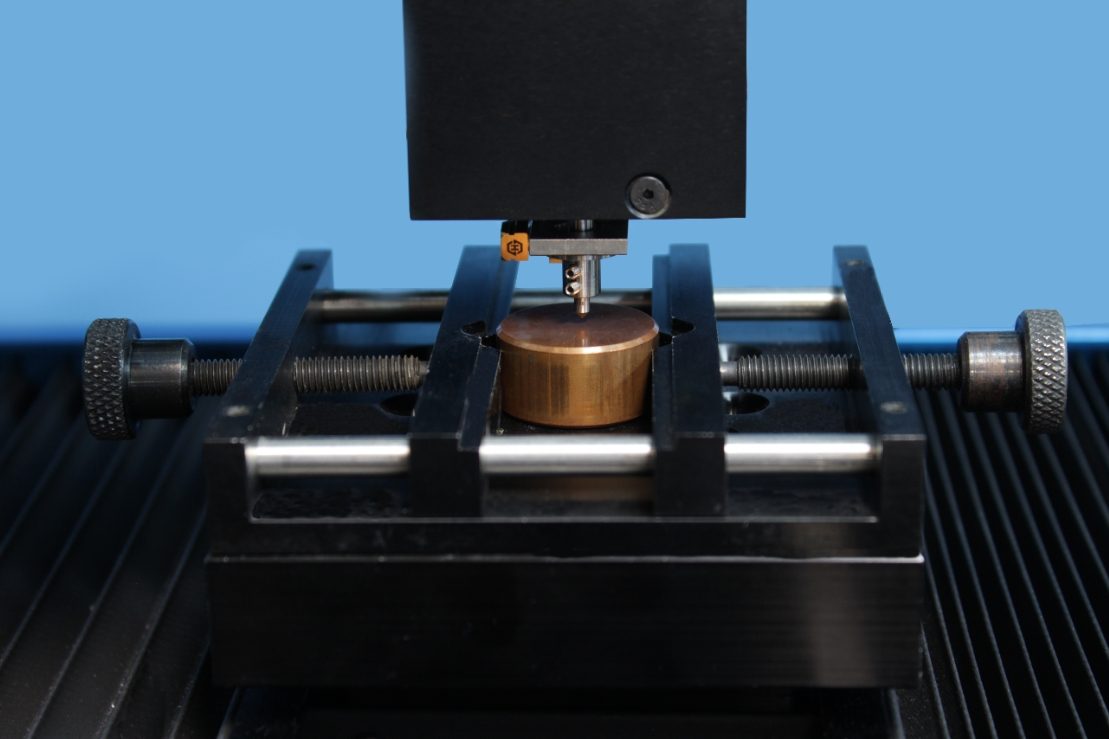
As per ASTM E328i, “Standard Test Methods for Stress Relaxation for Materials and Structures”, an external force is initially applied on a material or structure with an indenter until it reaches a predetermined maximum force. Once the maximum force is reached, the position of the indenter is held constant at this depth. Then the change in external force necessary to maintain the indenter’s position is measured as a function of time. The difficulty in stress relaxation testing is maintaining the depth constant. The Nanovea Mechanical Tester’s nanoindentation module accurately measures the stress relaxation by applying a closed (feedback) loop control of the depth with a piezo-electric actuator. The actuator reacts in real-time to keep the depth constant, while the change in load is measured and recorded by a highly sensitive load sensor. This test can be performed on virtually all types of materials without the need for stringent sample dimension requirements. Additionally, multiple tests can be performed on a single flat sample to ensure test repeatability
MEASUREMENT OBJECTIVE
In this application, the Nanovea Mechanical Tester’s nanoindentation module measures the stress relaxation behavior of an acrylic and copper sample. We showcase that the Nanovea Mechanical Tester is an ideal tool for evaluating the time-dependent viscoelastic behavior of polymer and metal materials.
TEST CONDITIONS
The stress relaxation of an acrylic and a copper sample was measured by the Nanovea Mechanical Tester’s nanoindentation module. Different indentation loading rates were applied ranging from 1 to 10 µm/min. The relaxation was measured at a fixed depth once the target maximum load was reached. A 100 second holding period was implemented at a fixed depth and the change in load was recorded as the holding time elapsed. All of the tests were conducted at ambient conditions (room temperature of 23 °C) and the indentation test parameters are summarized in Table 1.
RESULTS AND DISCUSSION
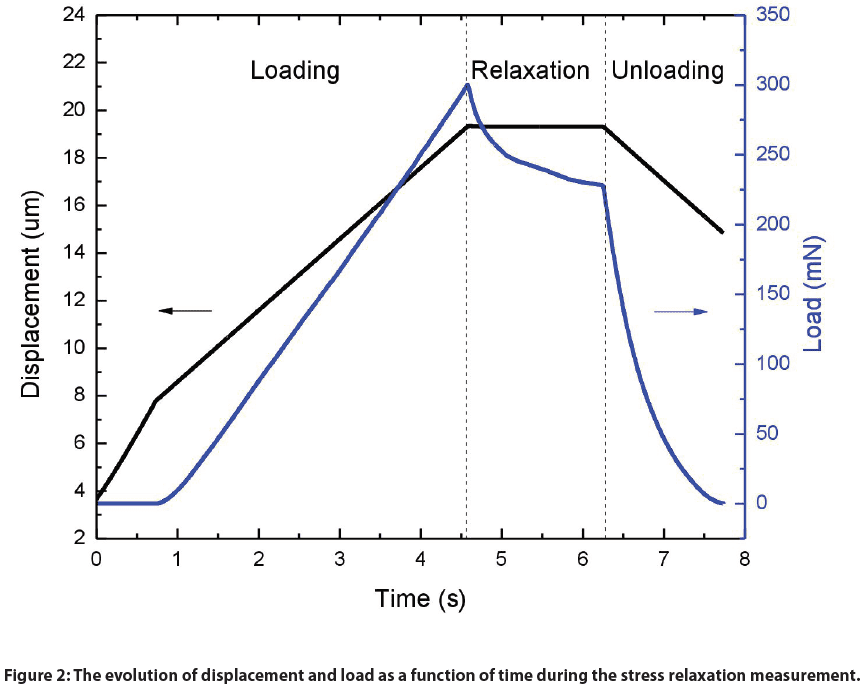
Figure 2 shows the evolution of displacement and load as a function of time during the stress relaxation measurement of an acrylic sample and an indentation loading rate of 3 µm/min as an example. The entirety of this test can be broken down into three stages: Loading, Relaxation and Unloading. During the Loading stage, the depth linearly increased as the load progressively increased. The Relaxation stage was initiated once the maximum load was reached. During this stage a constant depth was maintained for 100 seconds by using the closed feedback loop depth control feature of the instrument and it was observed that the load decreased over time. The entire test concluded with an unloading stage in order to remove the indenter from the acrylic sample.
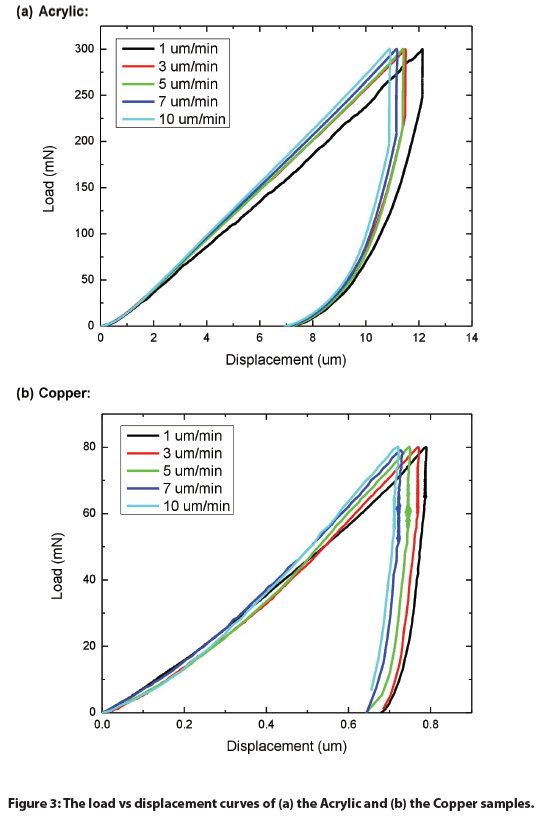
Additional indentation tests were conducted using the same indenter loading rates but excluding a relaxation (creep) period. Load vs. displacement plots were acquired from these tests and were combined in the graphs in Figure 3 for the acrylic and copper samples. As the indenter loading rate decreased from 10 to 1 µm/min, the load-displacement curve shifted progressively towards higher penetration depths for both Acrylic and Copper. Such a time-dependent increase in strain results from the viscoelastic creep effect of the materials. A lower loading rate allows a viscoelastic material to have more time to react to the external stress it experiences and to deform accordingly..
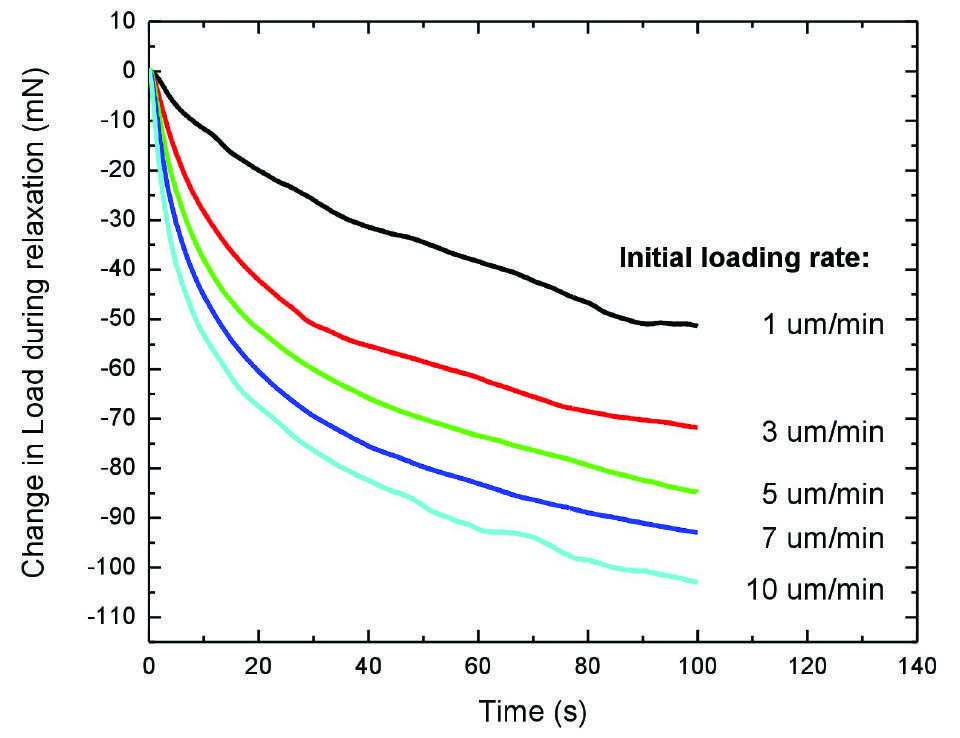
The evolution of load at a constant strain using different indentation loading rates were plotted in Figure 4 for both materials tested. The load decreased at a higher rate in the early stages of the relaxation stage (100 second hold period) of the tests and slowed down once the hold time reached ~50 seconds. Viscoelastic materials, such as polymers and metals, exhibit greater load loss rate when they are subjected to higher indentation loading rates. The load loss rate during relaxation increased from 51.5 to 103.2 mN for Acrylic, and from 15.0 to 27.4 mN for Copper, respectively, as the indentation loading rate increased from 1 to 10 µm/min, as summarized in Figure 5.
As mentioned In ASTM Standard E328ii, the major problem encountered in stress relaxation tests is an instrument’s inability of maintaining a constant strain/depth. The Nanovea Mechanical Tester provides excellent accurate stress relaxation measurements due to its ability to apply a closed feedback loop control of the depth between the fast acting piezo-electric actuator and the independent capacitor depth sensor. During the relaxation stage, the piezo-electric actuator adjusts the indenter to maintain its constant depth constraint in real-time while the change in load is measured and recorded by an independent high precision load sensor.
CONCLUSION
The stress relaxation of an acrylic and a copper sample were measured using the nanoindentation module of the Nanovea Mechanical Tester at different loading rates. A greater maximum depth is reached when indentations are performed at lower loading rates due to the creep effect of the material during loading. Both the acrylic and the copper sample exhibit stress relaxation behavior when the indenter position at a targeted maximum load is held constant. Larger changes in load loss during the relaxation stage were observed for the tests with higher indentation loading rates.
The stress relaxation test produced by the Nanovea Mechanical Tester showcase the instruments ability to quantify and reliably measure the time-dependent viscoelastic behavior of polymer and metal materials. It has an unmatched multi-function Nano and Micro modules on a single platform. Humidity and temperature control modules can be paired with these instruments for environmental testing capabilities applicable to a wide range of industries. Both the Nano and Micro modules include scratch testing, hardness testing, and wear testing modes, providing the widest and most user-friendly range of mechanical testing capabilities available on a single system.
NOW, LET'S TALK ABOUT YOUR APPLICATION
Categories
- Application Notes
- Block on Ring Tribology
- Corrosion Tribology
- Friction Testing | Coefficient of Friction
- High Temperature Mechanical Testing
- High Temperature Tribology
- Humidity and Gases Tribology
- Humidity Mechanical Testing
- Indentation | Creep and Relaxation
- Indentation | Fracture Toughness
- Indentation | Hardness and Elastic
- Indentation | Loss and Storage
- Indentation | Stress vs Strain
- Indentation | Yield Strength and Fatigue
- Laboratory Testing
- Linear Tribology
- Liquid Mechanical Testing
- Liquid Tribology
- Low Temperature Tribology
- Mechanical Testing
- Press Release
- Profilometry | Flatness and Warpage
- Profilometry | Geometry and Shape
- Profilometry | Roughness and Finish
- Profilometry | Step Height and Thickness
- Profilometry | Texture and Grain
- Profilometry | Volume and Area
- Profilometry Testing
- Ring on Ring Tribology
- Rotational Tribology
- Scratch Testing | Adhesive Failure
- Scratch Testing | Cohesive Failure
- Scratch Testing | Multi-Pass Wear
- Scratch Testing | Scratch Hardness
- Scratch Testing Tribology
- Tribology Testing
- Uncategorized
Archives
- March 2026
- November 2025
- September 2023
- August 2023
- June 2023
- May 2023
- July 2022
- May 2022
- April 2022
- January 2022
- December 2021
- November 2021
- October 2021
- September 2021
- August 2021
- July 2021
- June 2021
- May 2021
- March 2021
- February 2021
- December 2020
- November 2020
- October 2020
- September 2020
- July 2020
- May 2020
- April 2020
- March 2020
- February 2020
- January 2020
- November 2019
- October 2019
- September 2019
- August 2019
- July 2019
- June 2019
- May 2019
- April 2019
- March 2019
- January 2019
- December 2018
- November 2018
- October 2018
- September 2018
- July 2018
- June 2018
- April 2018
- March 2018
- February 2018
- November 2017
- October 2017
- September 2017
- August 2017
- June 2017
- May 2017
- March 2017
- February 2017
- January 2017
- November 2016
- October 2016
- August 2016
- July 2016
- June 2016
- May 2016
- April 2016
- March 2016
- February 2016
- January 2016
- December 2015
- November 2015
- October 2015
- September 2015
- August 2015
- July 2015
- June 2015
- May 2015
- April 2015
- March 2015
- February 2015
- January 2015
- November 2014
- October 2014
- September 2014
- August 2014
- July 2014
- June 2014
- May 2014
- April 2014
- March 2014
- February 2014
- January 2014
- December 2013
- November 2013
- October 2013
- September 2013
- August 2013
- July 2013
- June 2013
- May 2013
- April 2013
- March 2013
- February 2013
- January 2013
- December 2012
- November 2012
- October 2012
- September 2012
- August 2012
- July 2012
- June 2012
- May 2012
- April 2012
- March 2012
- February 2012
- January 2012
- December 2011
- November 2011
- October 2011
- September 2011
- August 2011
- July 2011
- June 2011
- May 2011
- November 2010
- January 2010
- April 2009
- March 2009
- January 2009
- December 2008
- October 2008
- August 2007
- July 2006
- March 2006
- January 2005
- April 2004


