USA/GLOBAL: +1-949-461-9292
EUROPE: +39-011-3052-794
CONTACT US

Paint Surface Morphology

PAINT SURFACE MORPHOLOGY

AUTOMATED REAL-TIME EVOLUTION MONITORING
USING NANOVEA 3D PROFILOMETER

Prepared by

DUANJIE LI, PhD

INTRODUCTION

Protective and decorative properties of paint play a significant role in a variety of industries, including automotive, marine, military, and construction. To achieve desired properties, such as corrosion resistance, UV protection, and abrasion resistance, paint formulas and architectures are carefully analyzed, modified, and optimized.

IMPORTANCE OF 3D NON-CONTACT PROFILOMETER FOR DRYING PAINT SURFACE MORPHOLOGY ANALYSIS

Paint is usually applied in liquid form and undergoes a drying process, which involves the evaporation of solvents and the transformation of the liquid paint into a solid film. During the drying process, the paint surface progressively changes its shape and texture. Different surface finishes and textures can be developed by using additives to modify the surface tension and flow properties of the paint. However, in cases of a poorly formulated paint recipe or improper surface treatment, undesired paint surface failures may occur.

Accurate in situ monitoring of the paint surface morphology during the drying period can provide direct insight into the drying mechanism. Moreover, real-time evolution of surface morphologies is very useful information in various applications, such as 3D printing. The NANOVEA 3D Non-Contact Profilometers measure the paint surface morphology of materials without touching the sample, avoiding any shape alteration that may be caused by contact technologies such as a sliding stylus.

MEASUREMENT OBJECTIVE

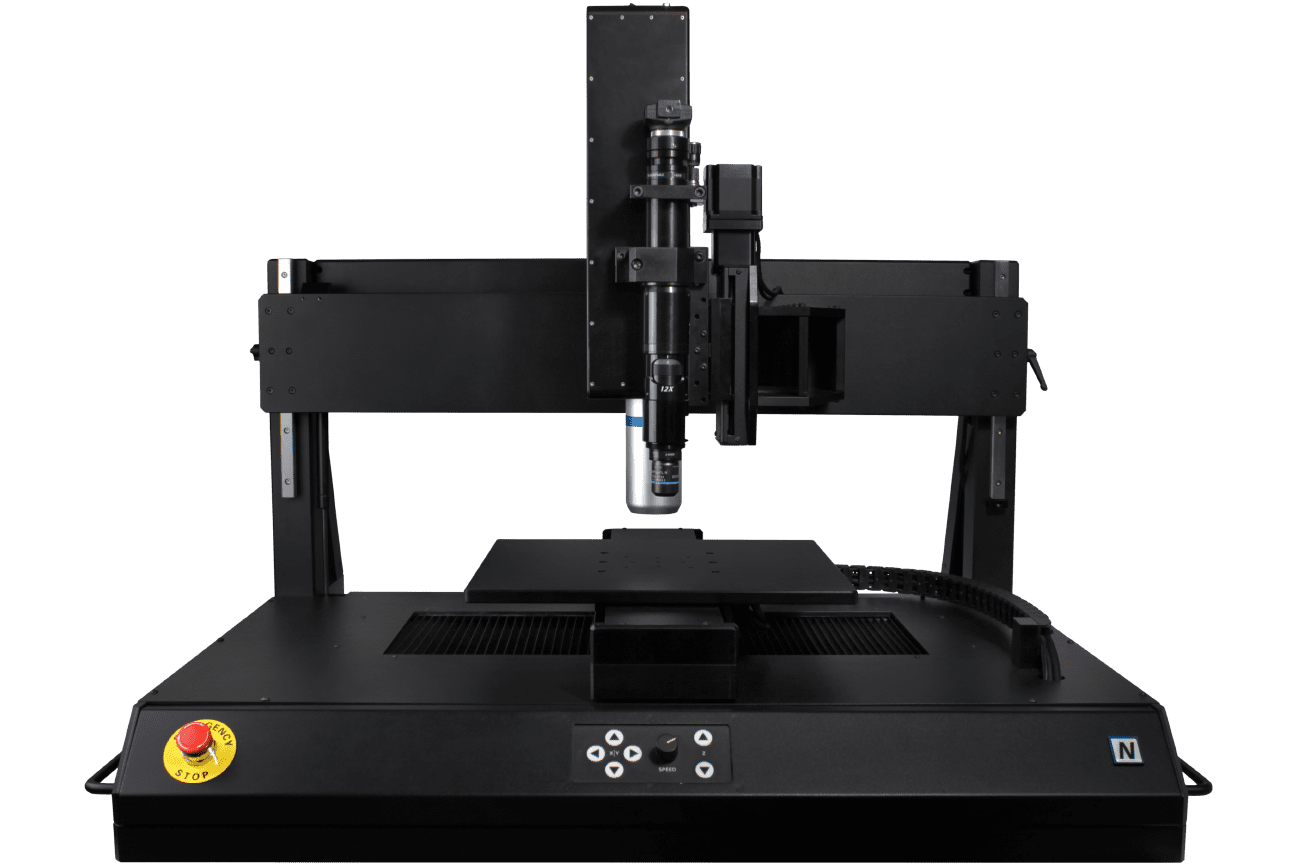
In this application, the NANOVEA ST500 Non-Contact Profilometer, equipped with a high-speed line optical sensor, is used to monitor the paint surface morphology during its 1-hour drying period. We showcase the NANOVEA Non-Contact Profilometer’s capability in providing automated real-time 3D profile measurement of materials with continuous shape change.

NANOVEA

ST500

RESULTS & DISCUSSION

The paint was applied on the surface of a metal sheet, followed immediately by automated measurements of the morphology evolution of the drying paint in situ using the NANOVEA ST500 Non-Contact Profilometer equipped with a high-speed line sensor. A macro had been programmed to automatically measure and record the 3D surface morphology at specific time intervals: 0, 5, 10, 20, 30, 40, 50, and 60 min. This automated scanning procedure enables users to perform scanning tasks automatically by running set procedures in sequence, significantly reducing effort, time, and possible user errors compared to manual testing or repeated scans. This automation proves to be extremely useful for long-term measurements involving multiple scans at different time intervals.

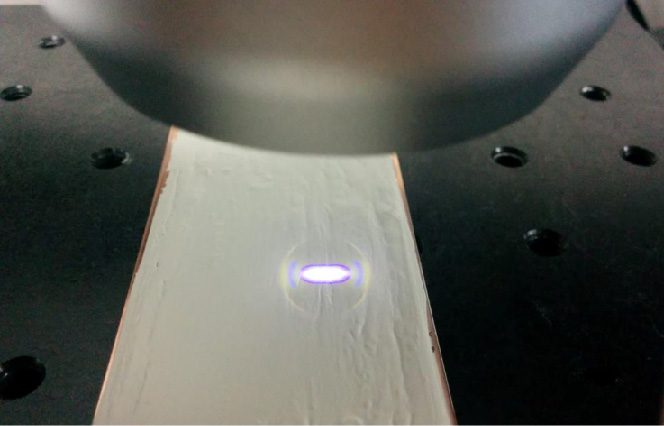
The optical line sensor generates a bright line consisting of 192 points, as shown in FIGURE 1. These 192 light points scan the sample surface simultaneously, significantly increasing the scanning speed. This ensures that each 3D scan is completed quickly to avoid substantial surface changes during each individual scan.

FIGURE 1: Optical line sensor scanning the surface of the drying paint.

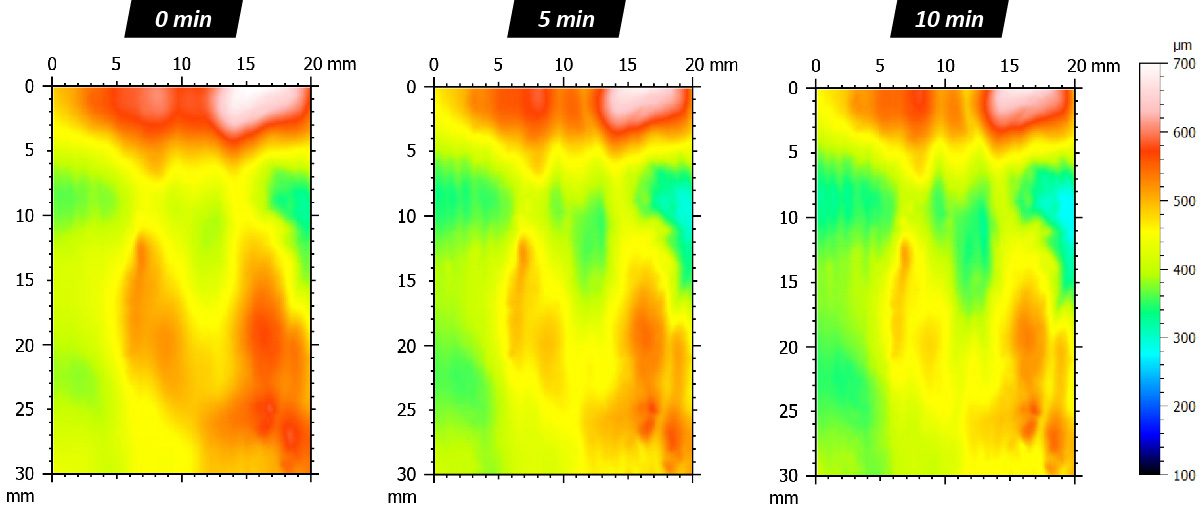
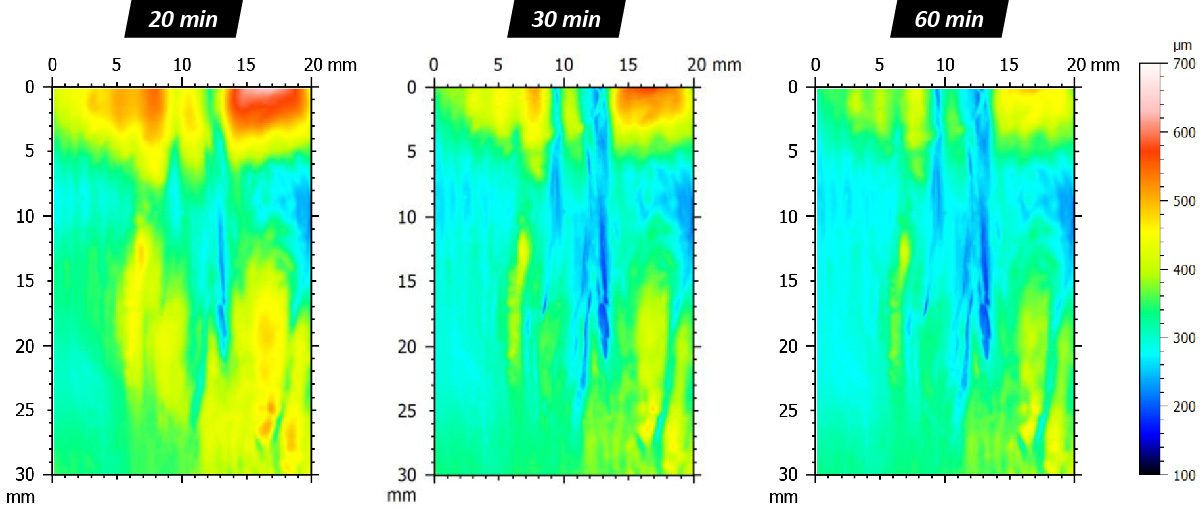
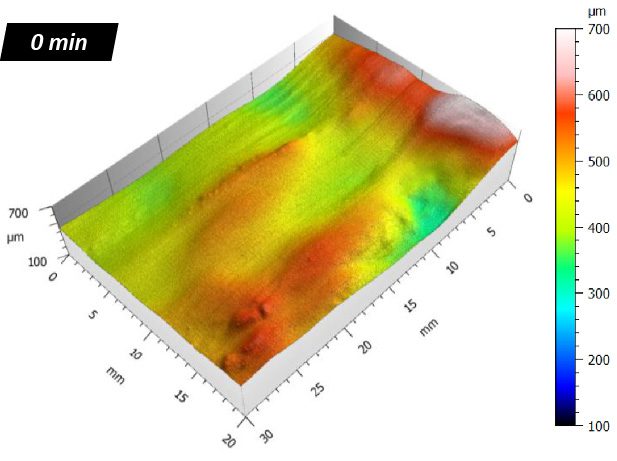
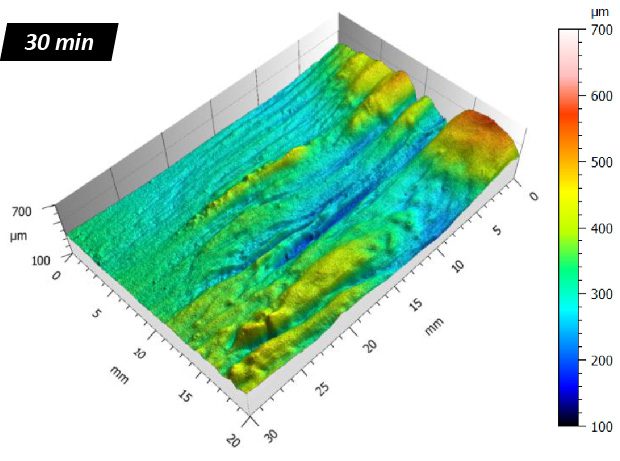
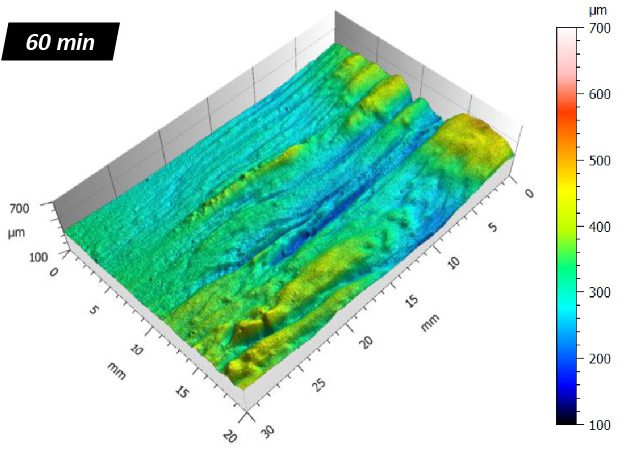
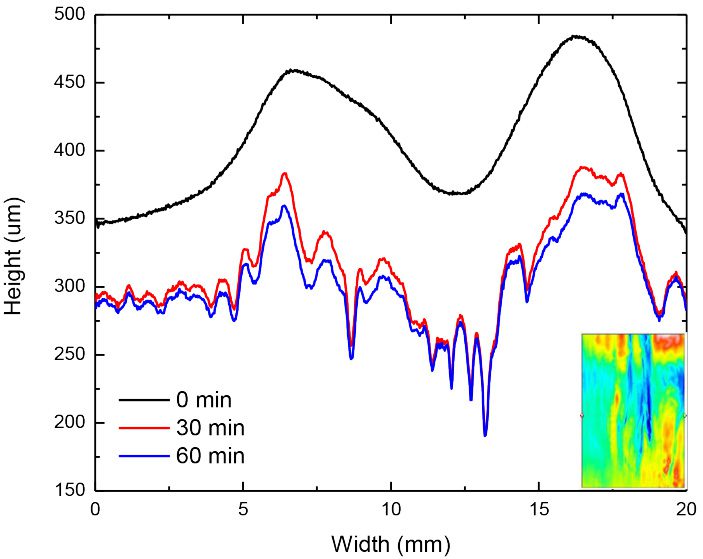
The false color view, 3D view, and 2D profile of the drying paint topography at representative times are shown in FIGURE 2, FIGURE 3, and FIGURE 4, respectively. The false color in the images facilitates the detection of features that are not readily discernible. Different colors represent height variations across different areas of the sample surface. The 3D view provides an ideal tool for users to observe the paint surface from different angles. During the first 30 minutes of the test, the false colors on the paint surface gradually change from warmer tones to cooler ones, indicating a progressive decrease in height over time in this period. This process slows down, as shown by the mild color change when comparing the paint at 30 and 60 minutes.

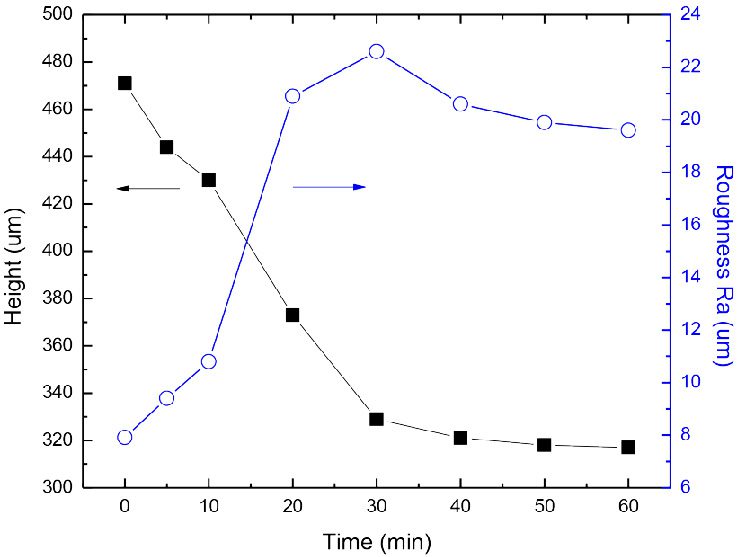
The average sample height and roughness Sa values as a function of the paint drying time are plotted in FIGURE 5. The full roughness analysis of the paint after 0, 30, and 60 min drying time are listed in TABLE 1. It can be observed that the average height of the paint surface rapidly decreases from 471 to 329 µm in the first 30 min of drying time. The surface texture develops at the same time as the solvent vaporizes, leading to an increased roughness Sa value from 7.19 to 22.6 µm. The paint drying process slows down thereafter, resulting in a gradual decrease of the sample height and Sa value to 317 µm and 19.6 µm, respectively, at 60 min.

This study highlights the capabilities of the NANOVEA 3D Non-Contact Profilometer in monitoring the 3D surface changes of the drying paint in real-time, providing valuable insights into the paint drying process. By measuring the surface morphology without touching the sample, the profilometer avoids introducing shape alterations to the undried paint, which can occur with contact technologies like sliding stylus. This non-contact approach ensures accurate and reliable analysis of drying paint surface morphology.

FIGURE 2: Evolution of the drying paint surface morphology at different times.

FIGURE 3: 3D view of the paint surface evolution at different drying times.

FIGURE 4: 2D profile across the paint sample after different drying times.

FIGURE 5: Evolution of the average sample height and roughness value Sa as a function of the paint drying time.

ISO 25178

Drying time (min) 0 5 10 20 30 40 50 60
Sq (µm) 7.91 9.4 10.8 20.9 22.6 20.6 19.9 19.6
Sku 26.3 19.8 14.6 11.9 10.5 9.87 9.83 9.82
Sp (µm) 97.4 105 108 116 125 118 114 112
Sv (µm) 127 70.2 116 164 168 138 130 128
Sz (µm) 224 175 224 280 294 256 244 241
Sa (µm) 4.4 5.44 6.42 12.2 13.3 12.2 11.9 11.8

Sq – Root-mean-square height | Sku – Kurtosis | Sp – Maximum peak height | Sv – Maximum pit height | Sz – Maximum height | Sv – Arithmetic mean height

TABLE 1: Paint roughness at different drying times.

CONCLUSION

In this application, we have showcased the capabilities of the NANOVEA ST500 3D Non-Contact Profilometer in monitoring the evolution of paint surface morphology during the drying process. The high-speed optical line sensor, generating a line with 192 light spots that scan the sample surface simultaneously, has made the study time-efficient while ensuring unmatched accuracy.

The macro function of the acquisition software allows for programming automated measurements of the 3D surface morphology in situ, making it particularly useful for long-term measurement involving multiple scans at specific target time intervals. It significantly reduces the time, effort, and potential for user errors. The progressive changes in surface morphology are continuously monitored and recorded in real-time as the paint dries, providing valuable insights into the paint drying mechanism.

The data shown here represents only a fraction of the calculations available in the analysis software. NANOVEA Profilometers are capable of measuring virtually any surface, whether it’s transparent, dark, reflective, or opaque.


NOW, LET'S TALK ABOUT YOUR APPLICATION

Comment