ABD/GLOBAL: +1-949-461-9292
AVRUPA: +39-011-3052-794
BİZE ULAŞIN
stent coating adhesion testing failure analysis drug eluting stent coating

Stent Coating Adhesion and Delamination Analysis Using Nano Scratch Testing

Application Note | Stent Coating Adhesion Testing

Stent Coating Adhesion and Delamination Analysis Using Nano Scratch Testing

Quantifying Coating Failure and Adhesion Performance on Drug-Eluting Stents

stent coating adhesion testing nano scratch delamination critical load

Research & Experimental Testing

Duanjie Li, PhD

Visual Design & Editorial

Andrew Shore

Giriş

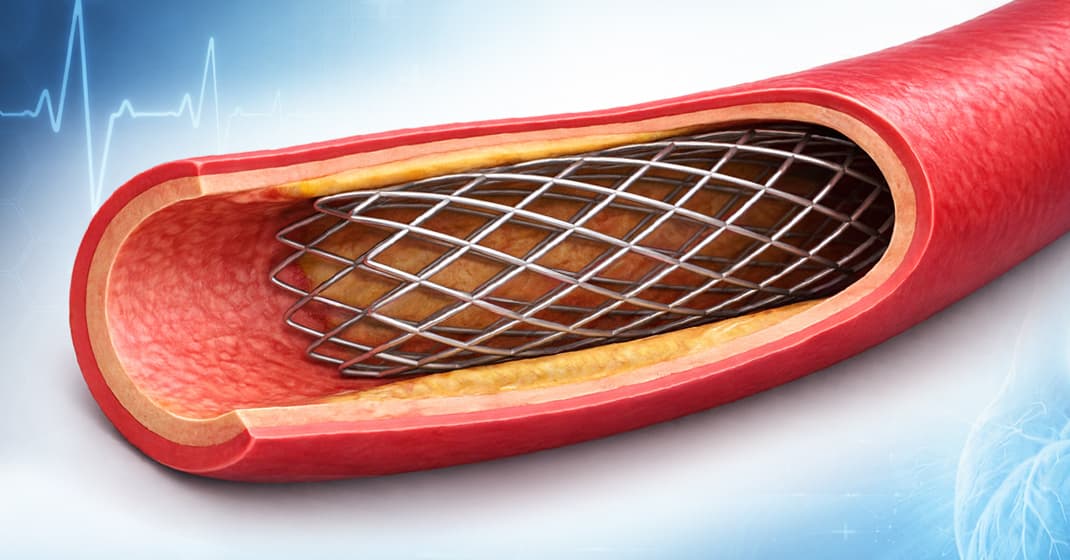
Blood is carried through arteries from the heart to the rest of the body. Any weakening or blockage of these vessels can pose significant health risks and may become life-threatening. A stent is a small mesh tube inserted into the lumen of a blood vessel to treat narrowed or weakened arteries. Stent implantation is now a widely used procedure to support the arterial wall and restore blood flowᶦ.

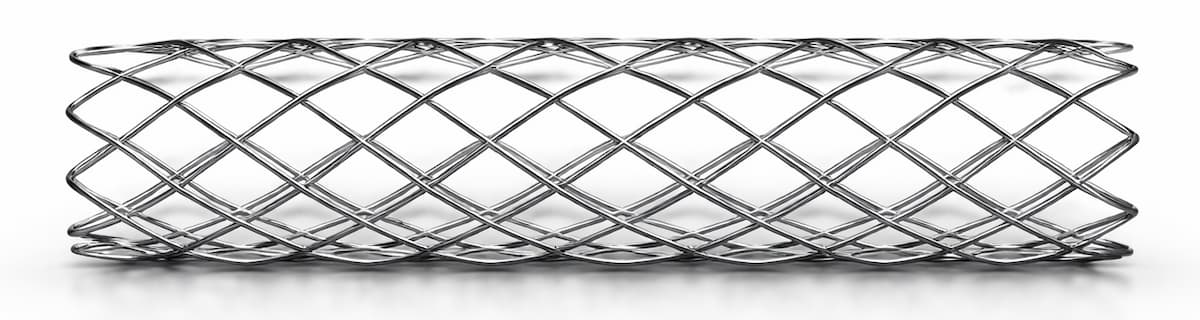
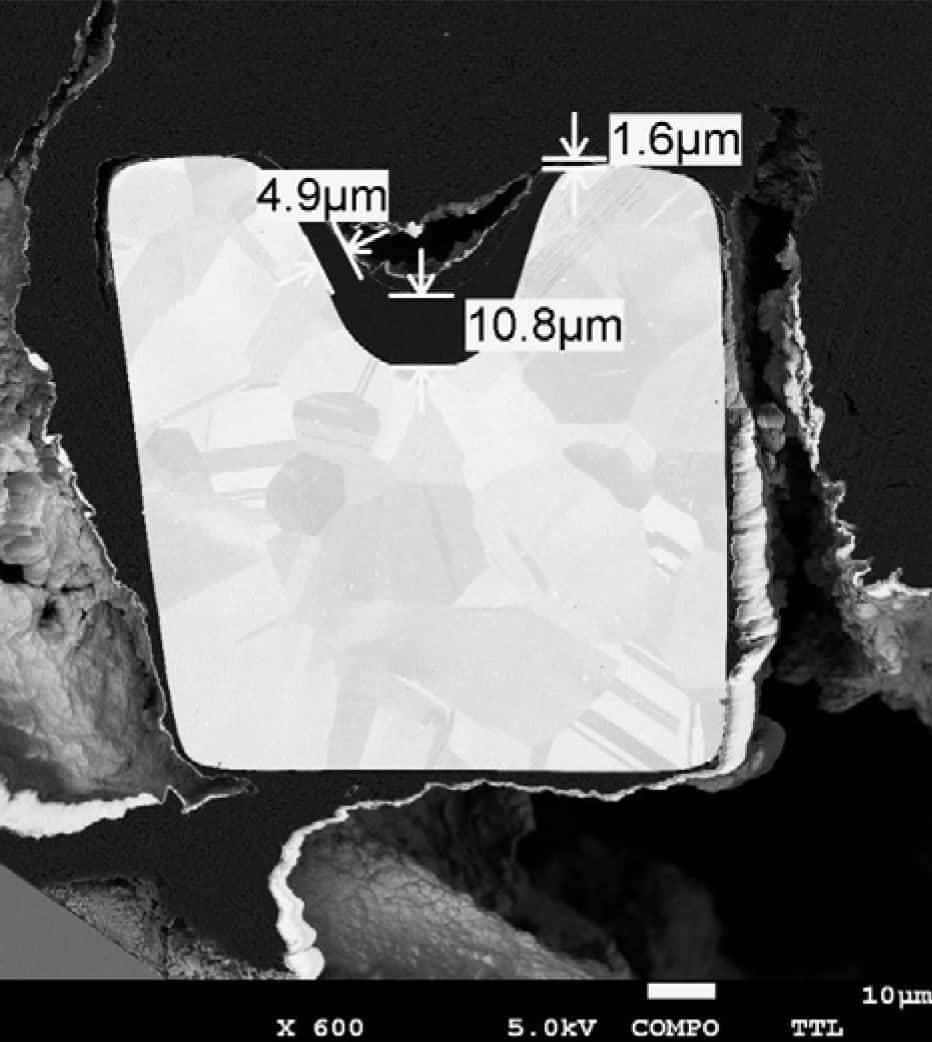
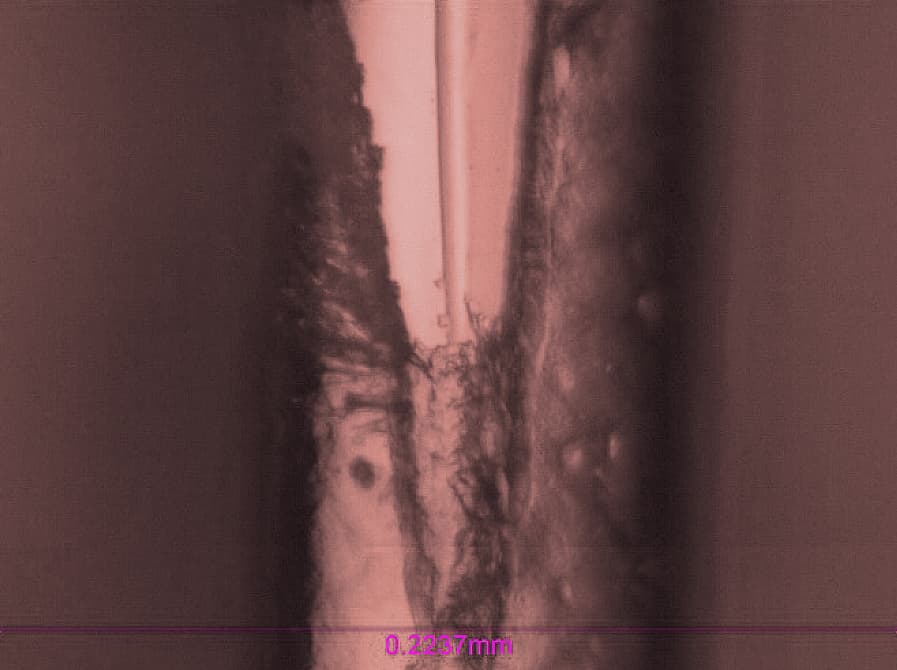
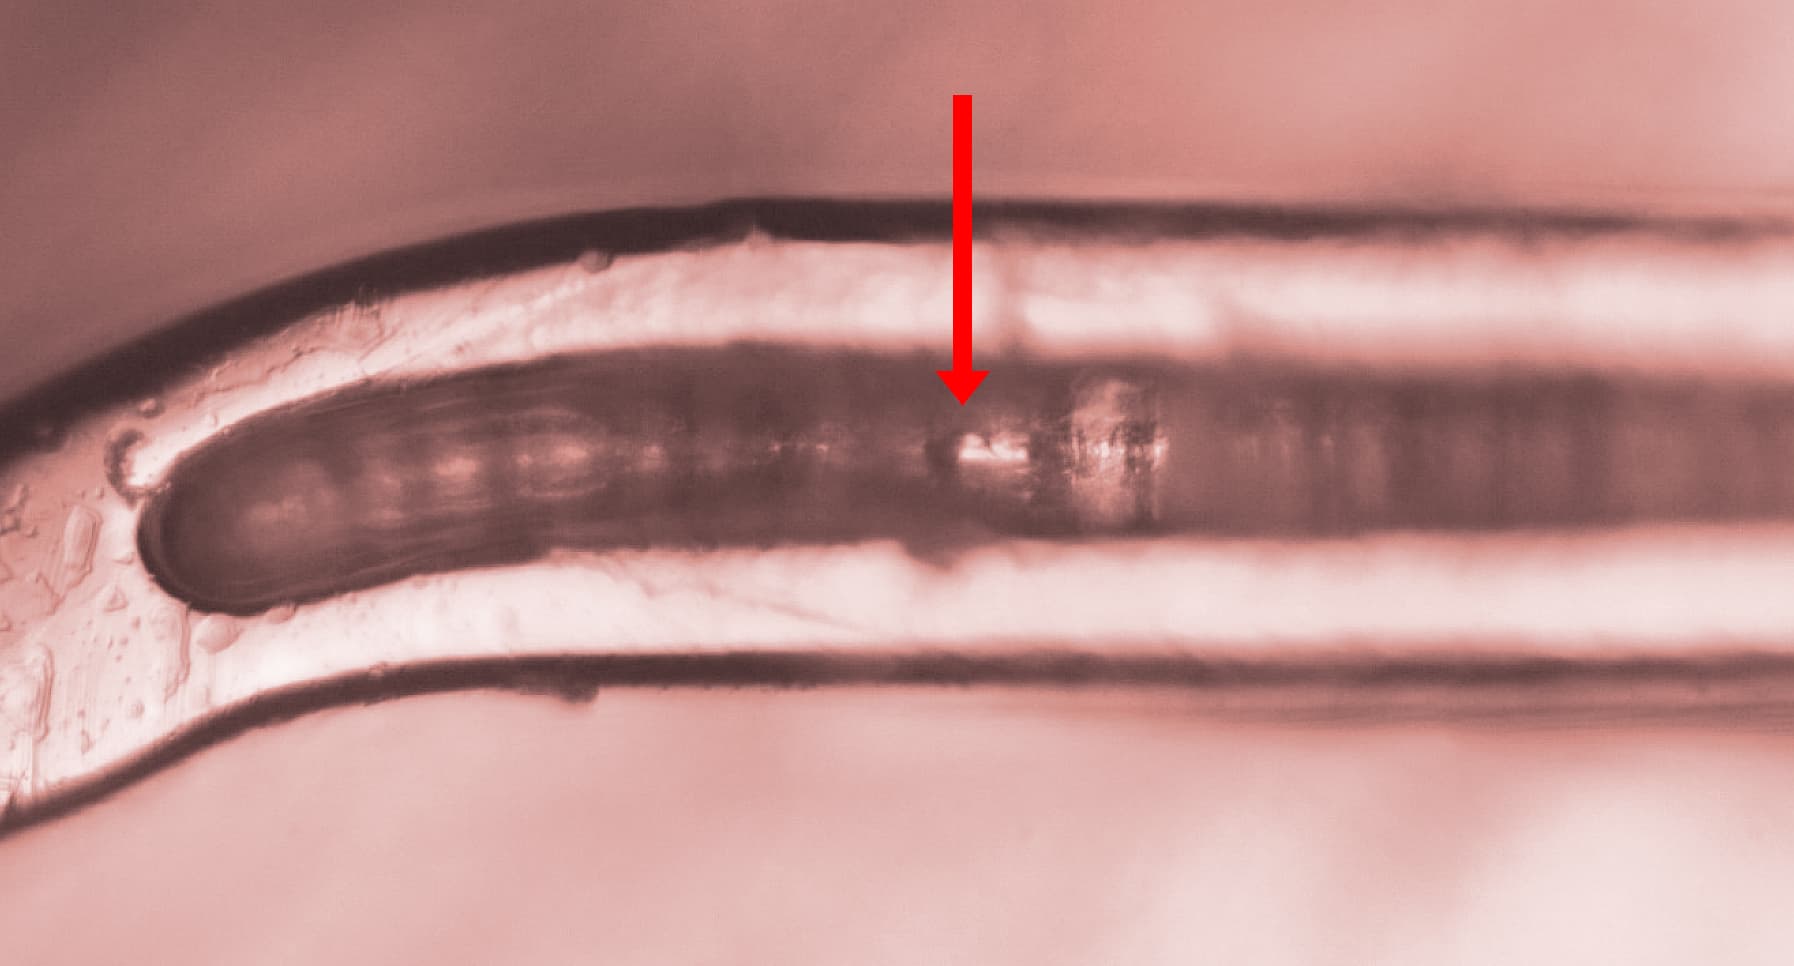
Metal stent mesh geometry illustrating the structural complexity of vascular implant design.

Why coating adhesion matters in drug-eluting stents

Drug-eluting stents represent a major advancement in stent technology. They incorporate a biodegradable, biocompatible polymer coating that enables controlled drug release at the arterial site, helping to inhibit intimal thickening and reduce the risk of restenosisᶦᶦ.

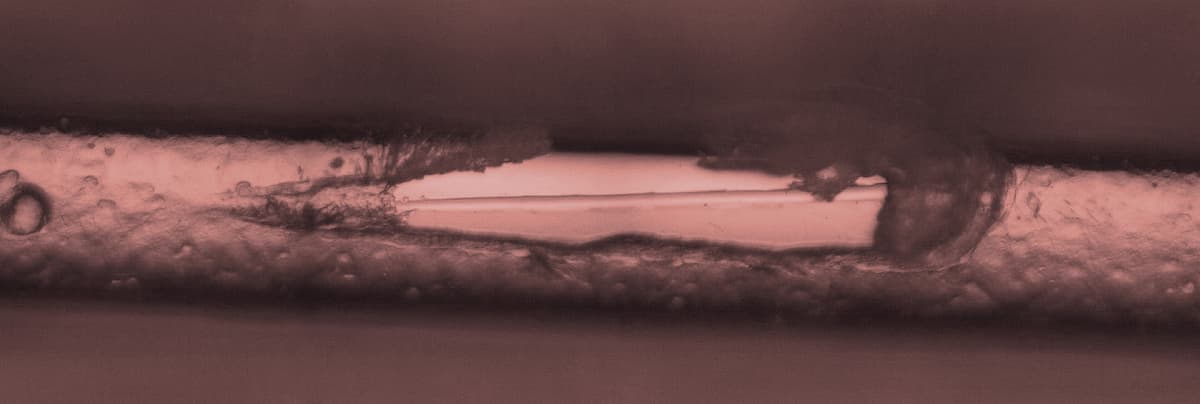
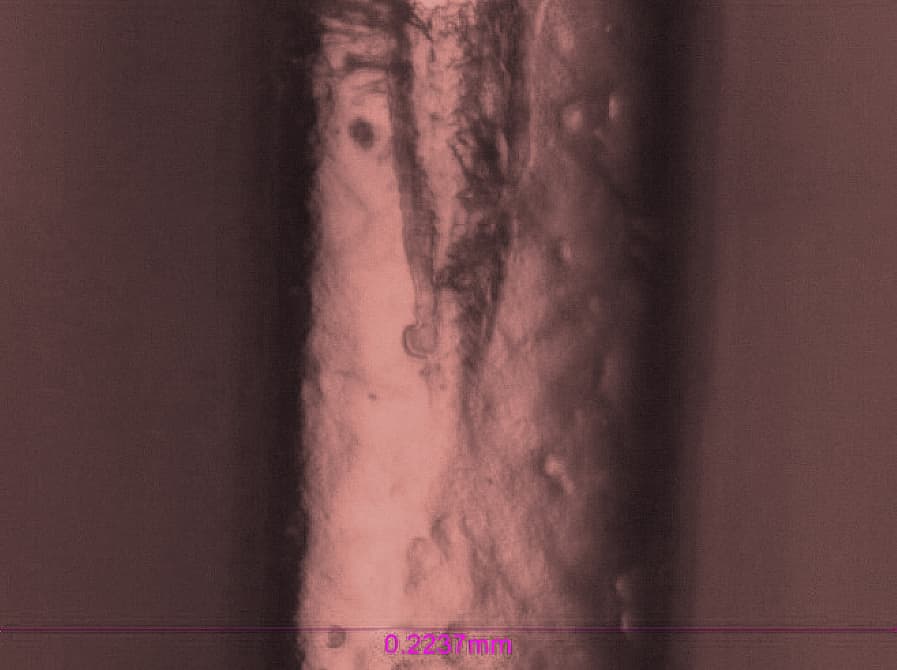
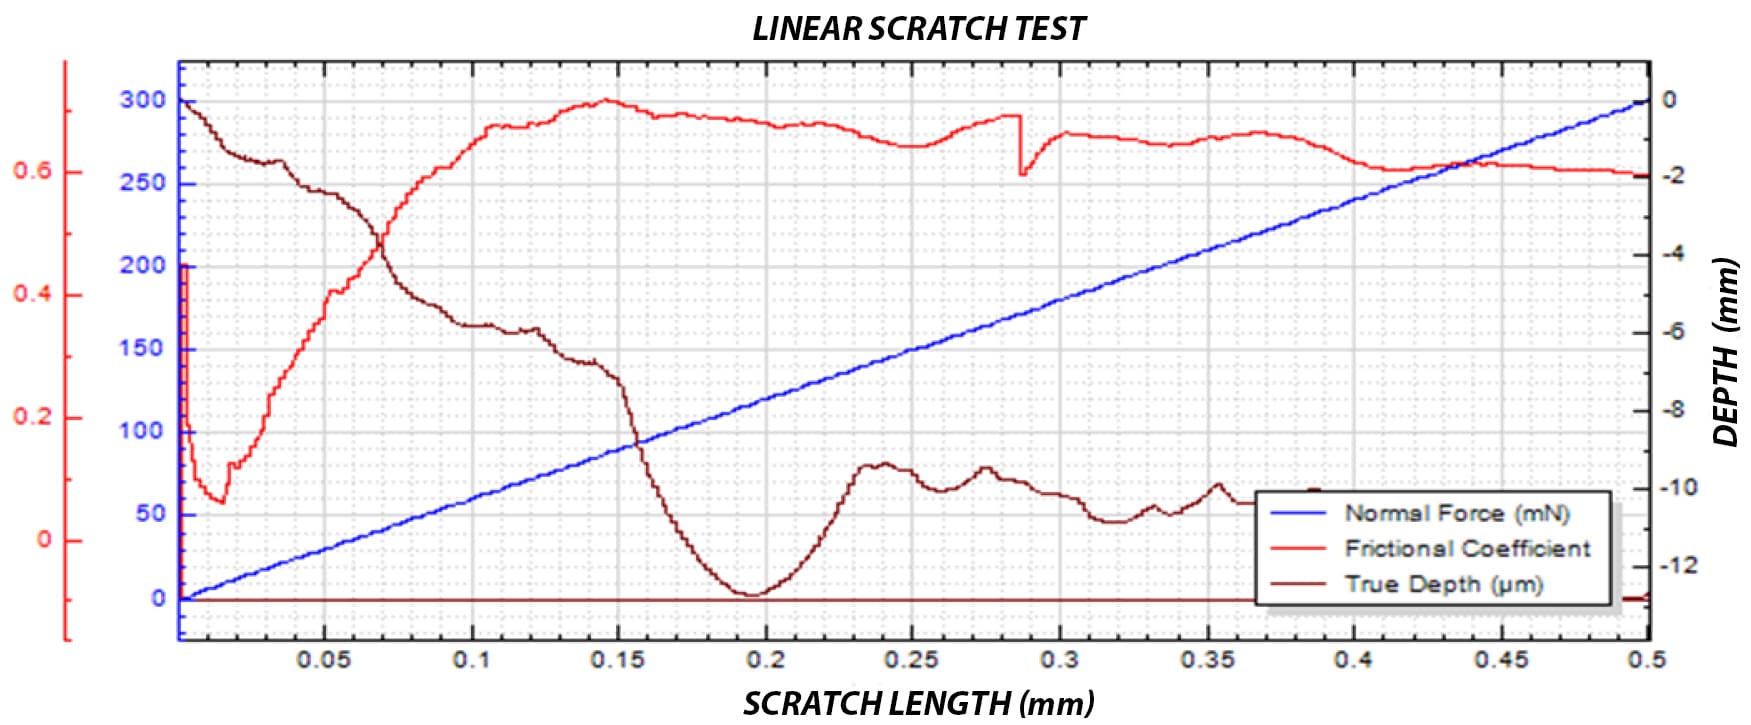
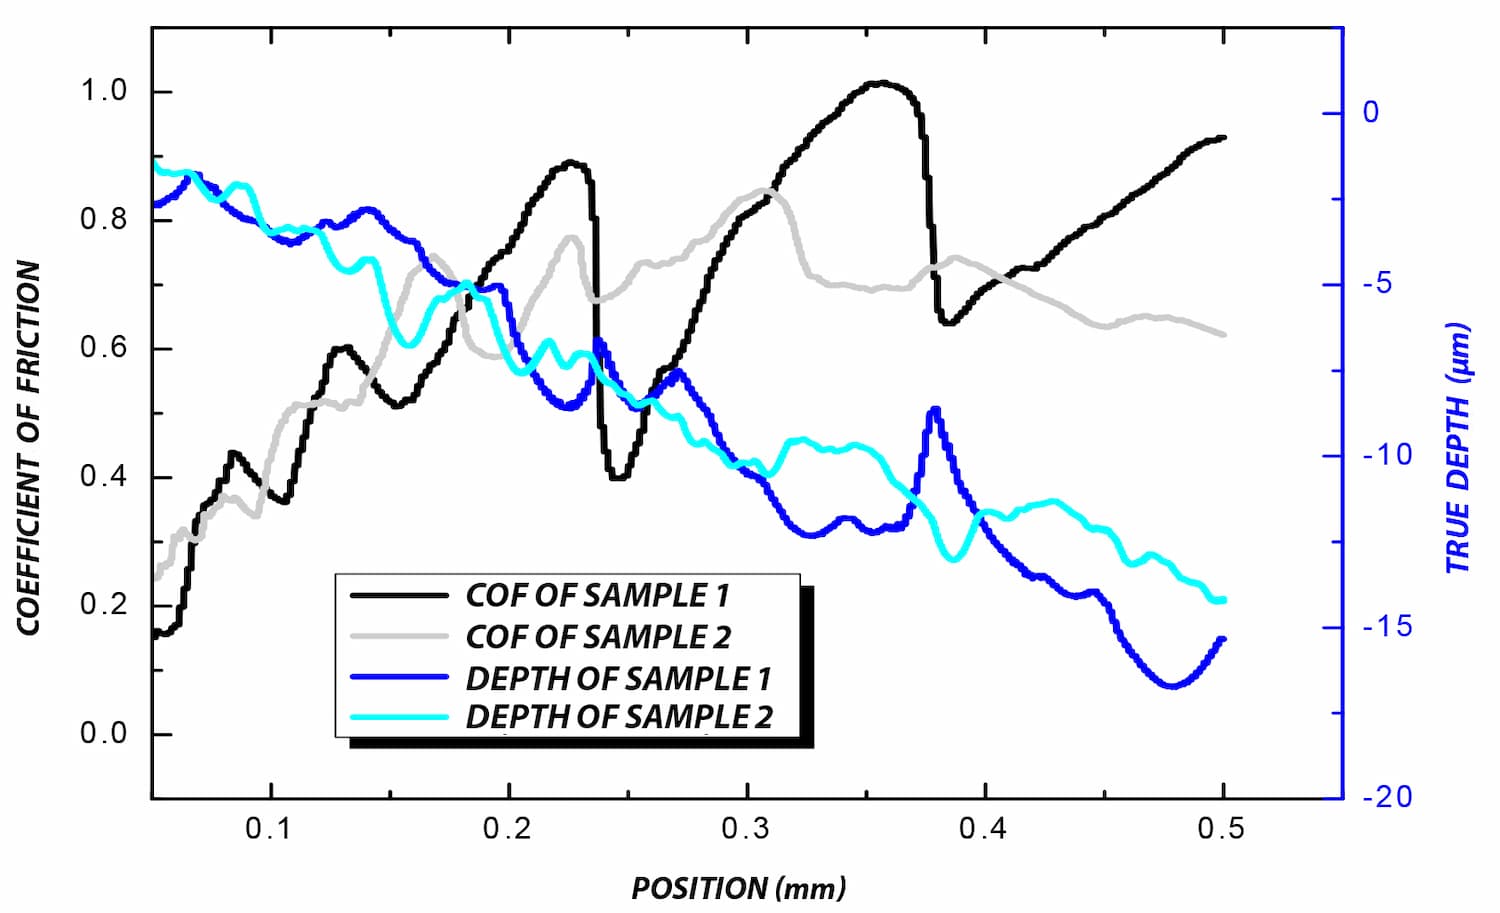
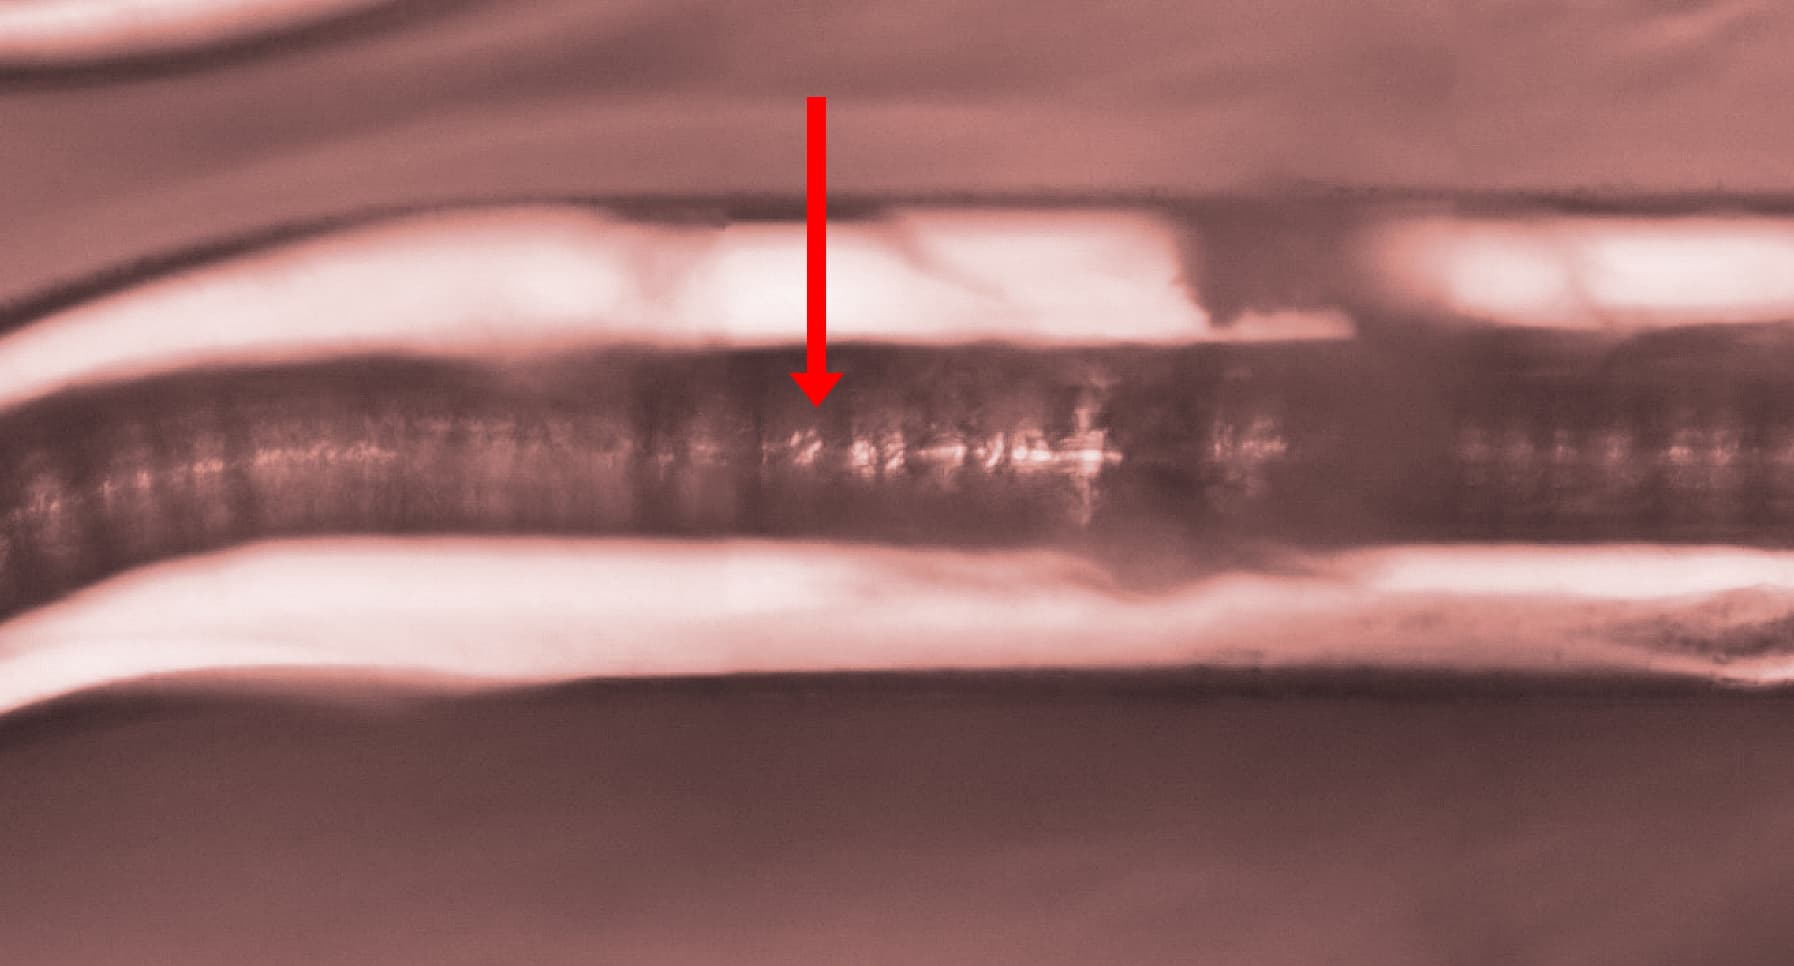
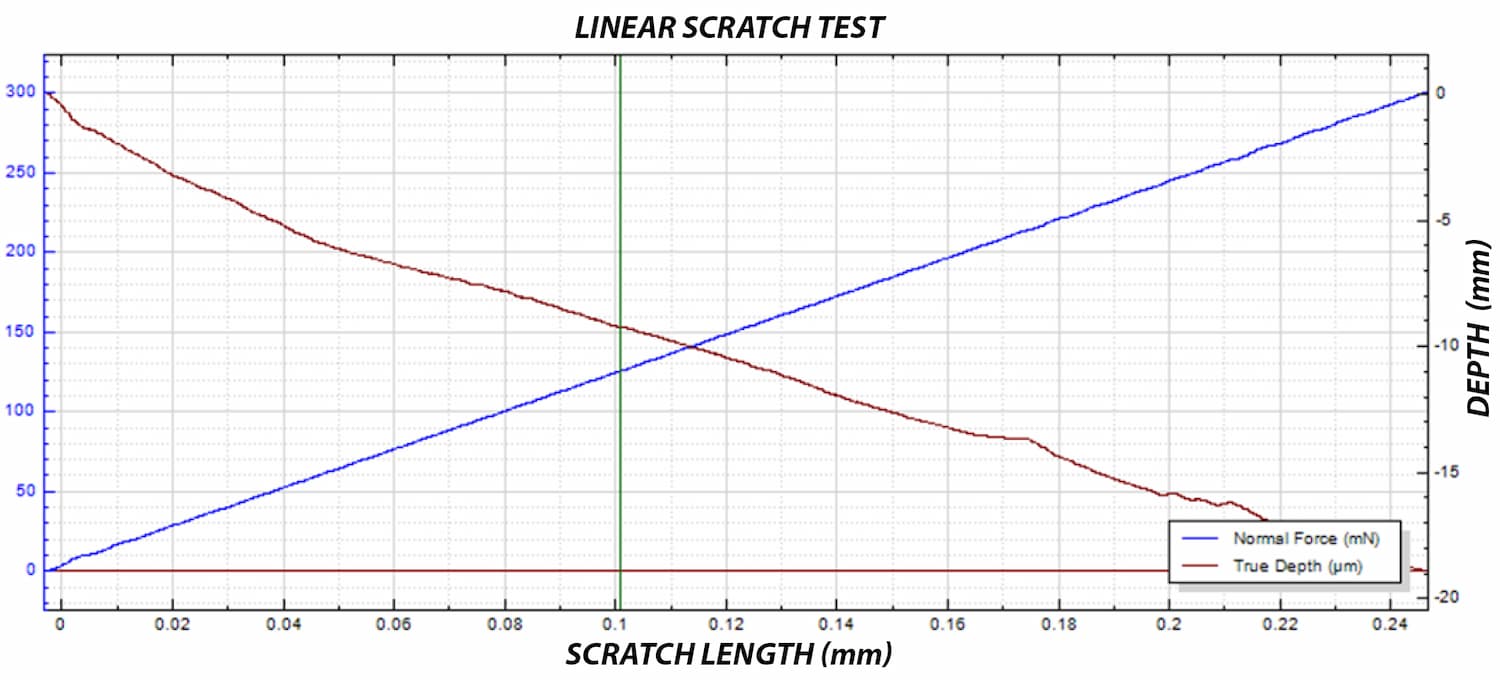
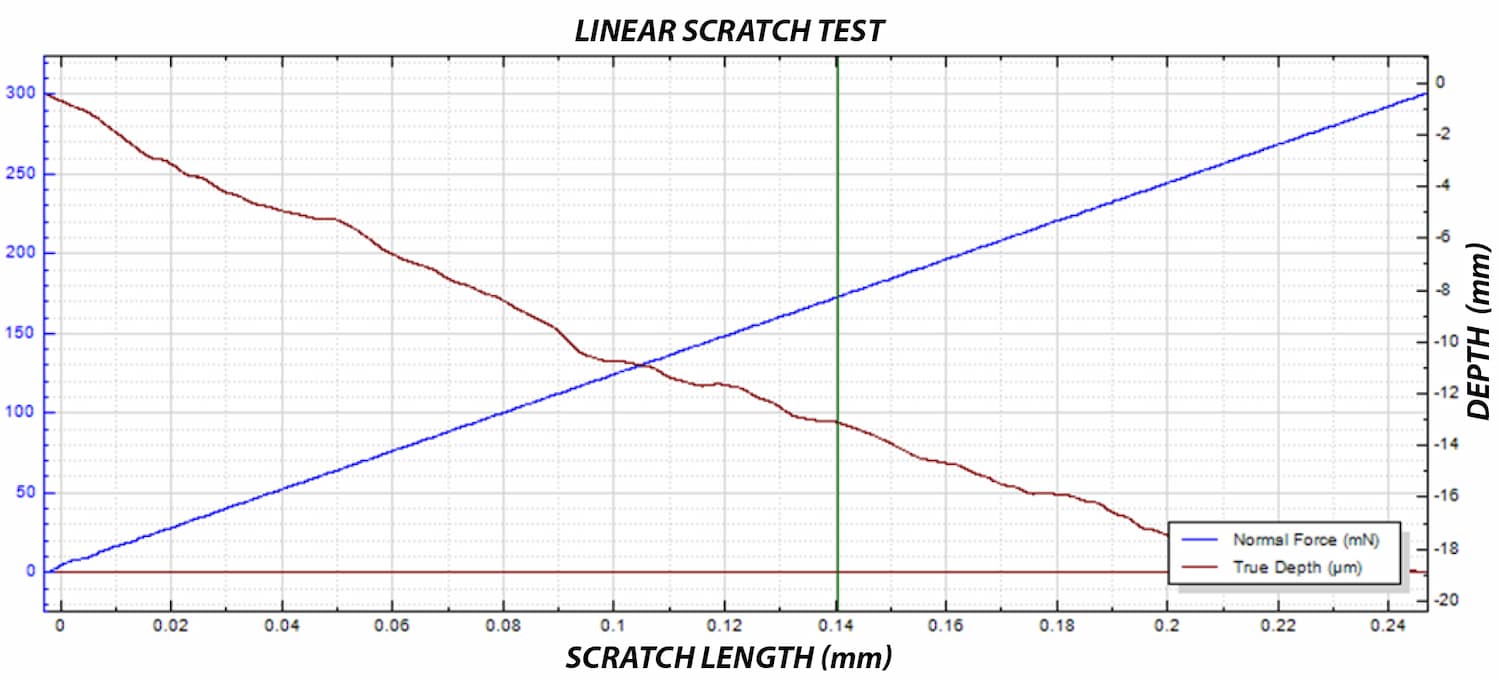
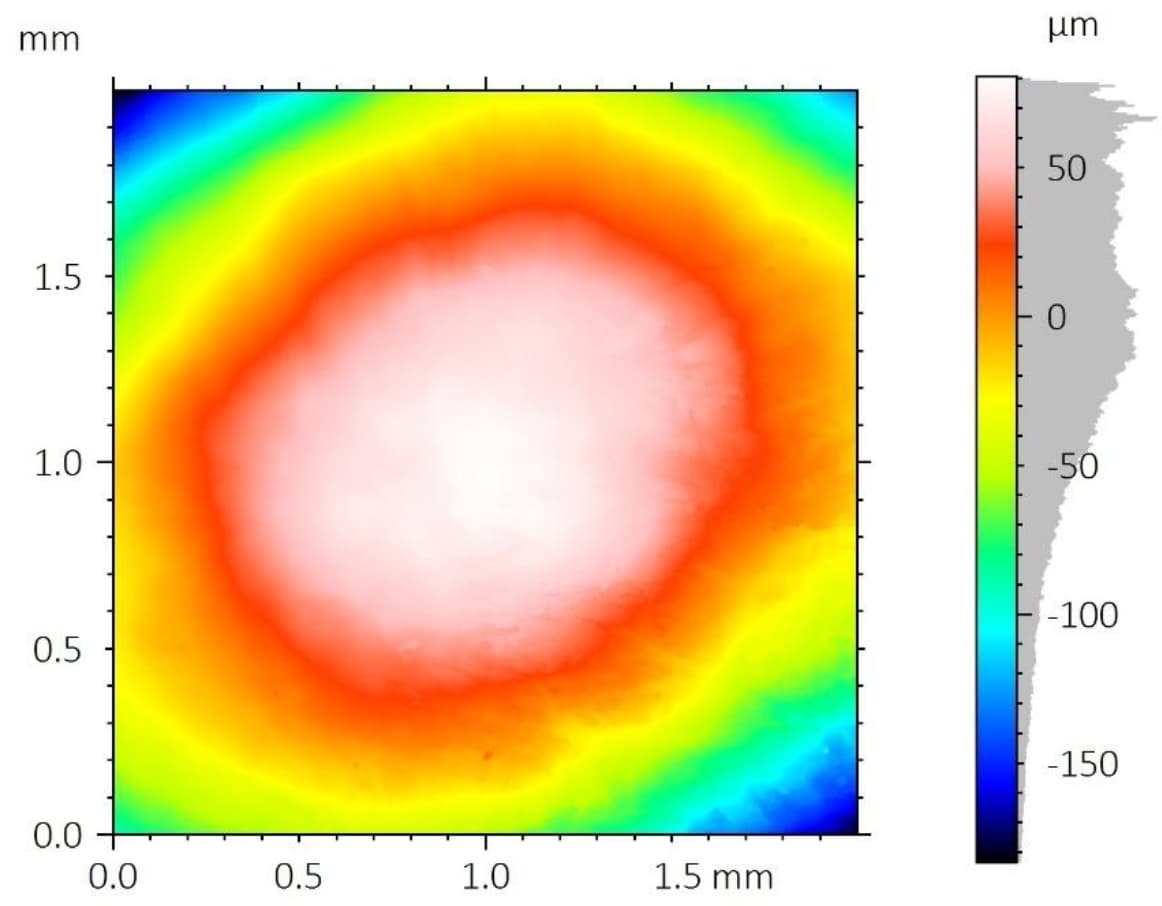
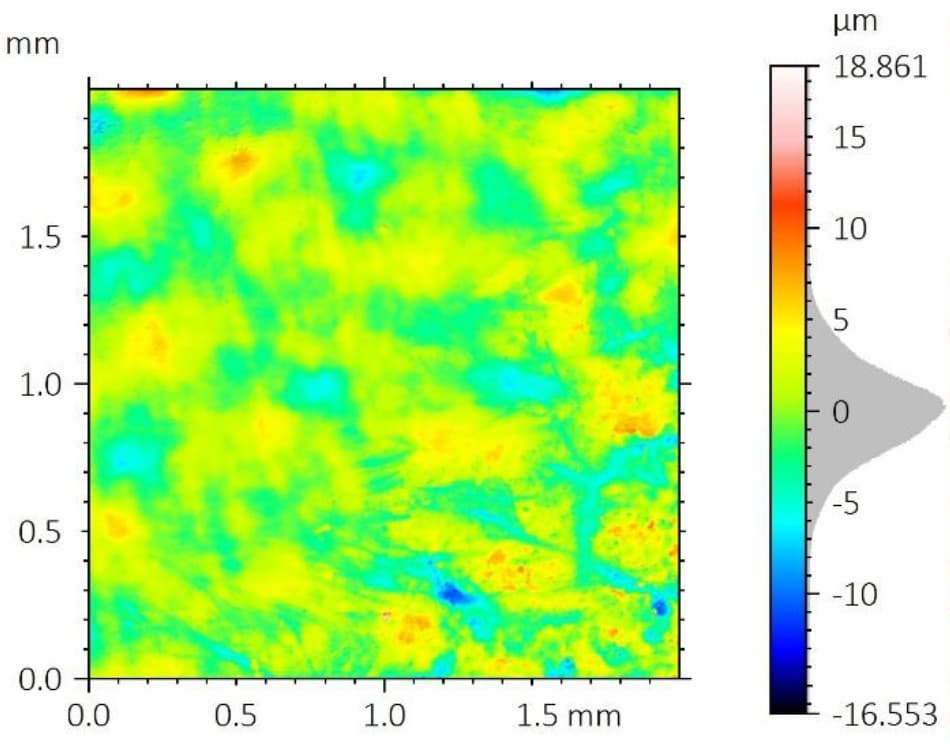
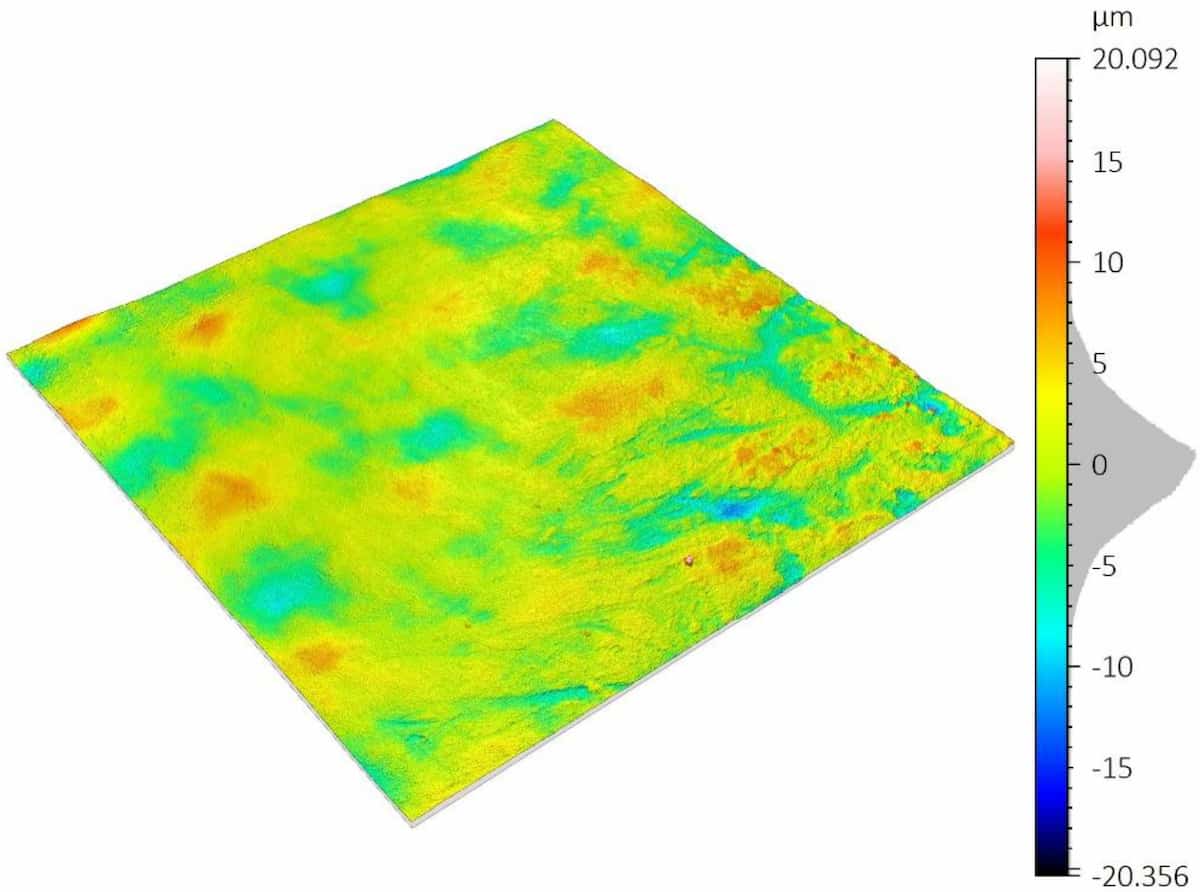
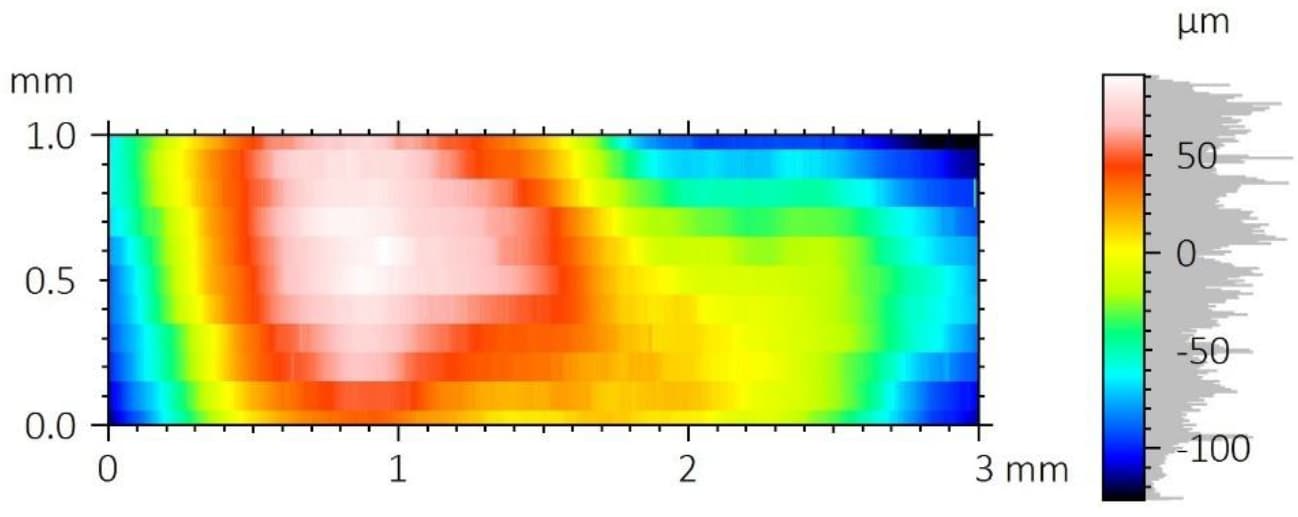
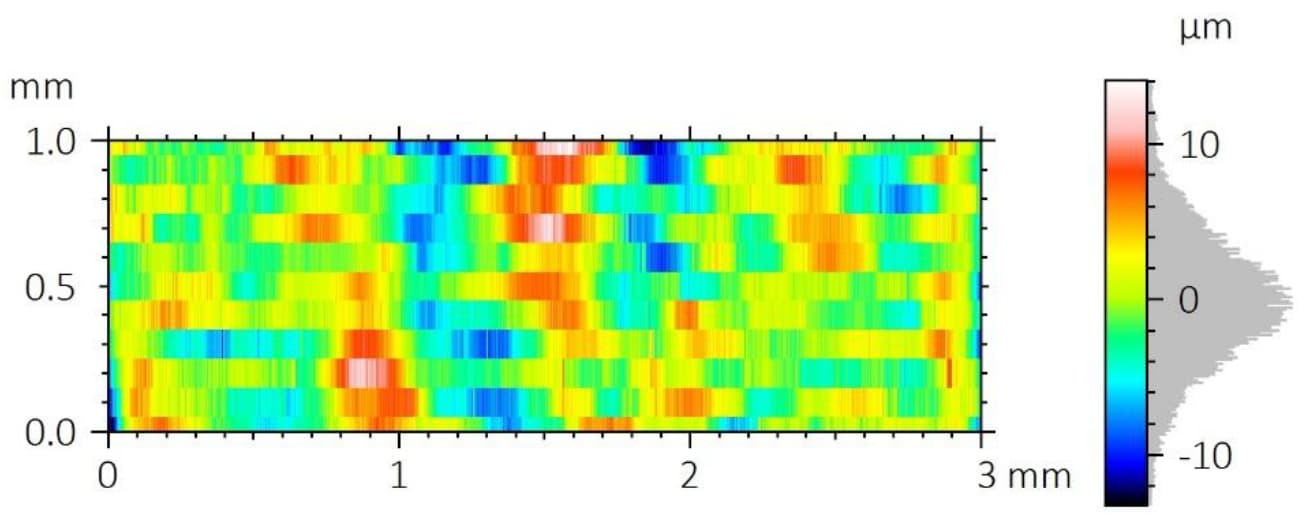
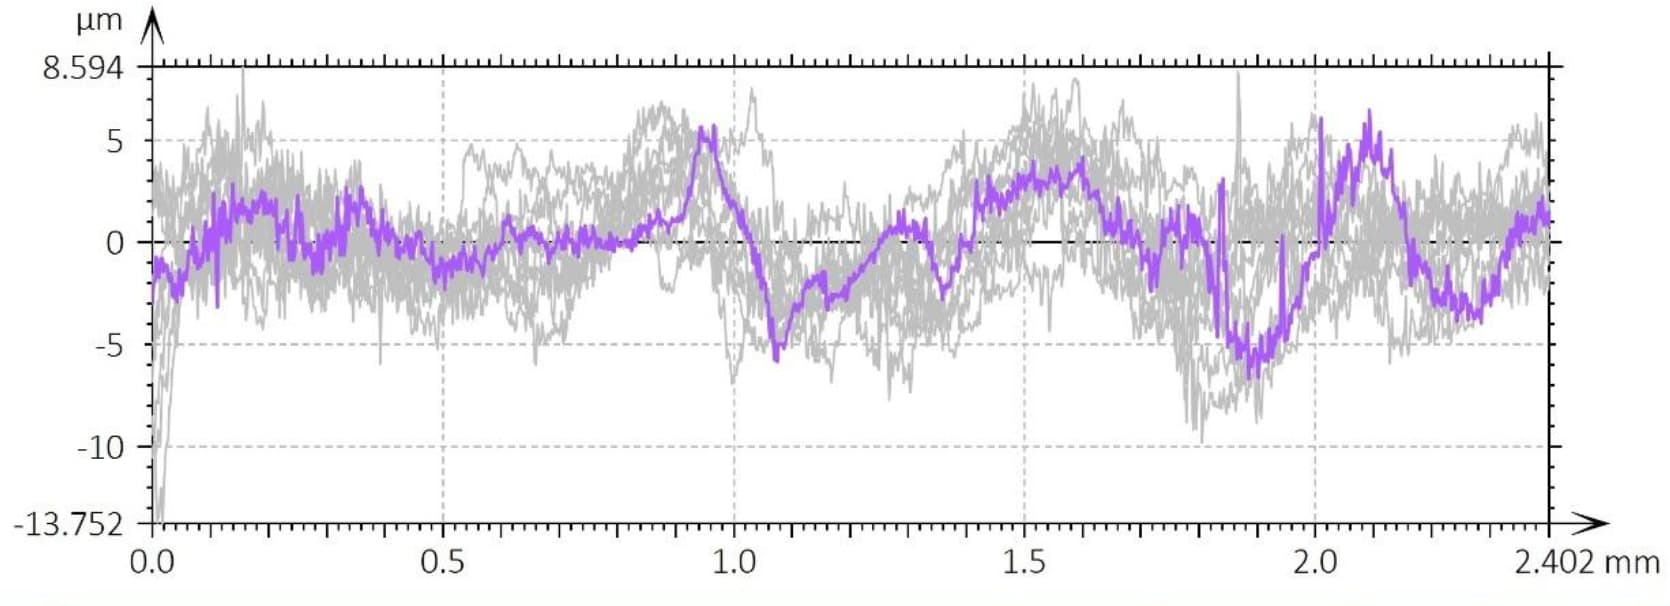
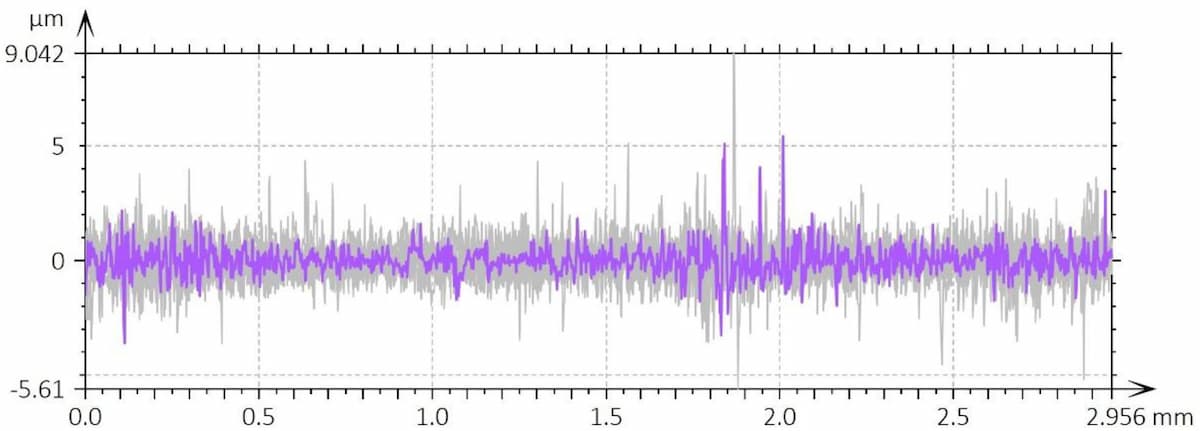
A critical concern in these systems is the delamination of the polymer coating from the metallic stent substrate. This coating carries the drug-eluting layer, and its adhesion directly impacts device performance and reliability.

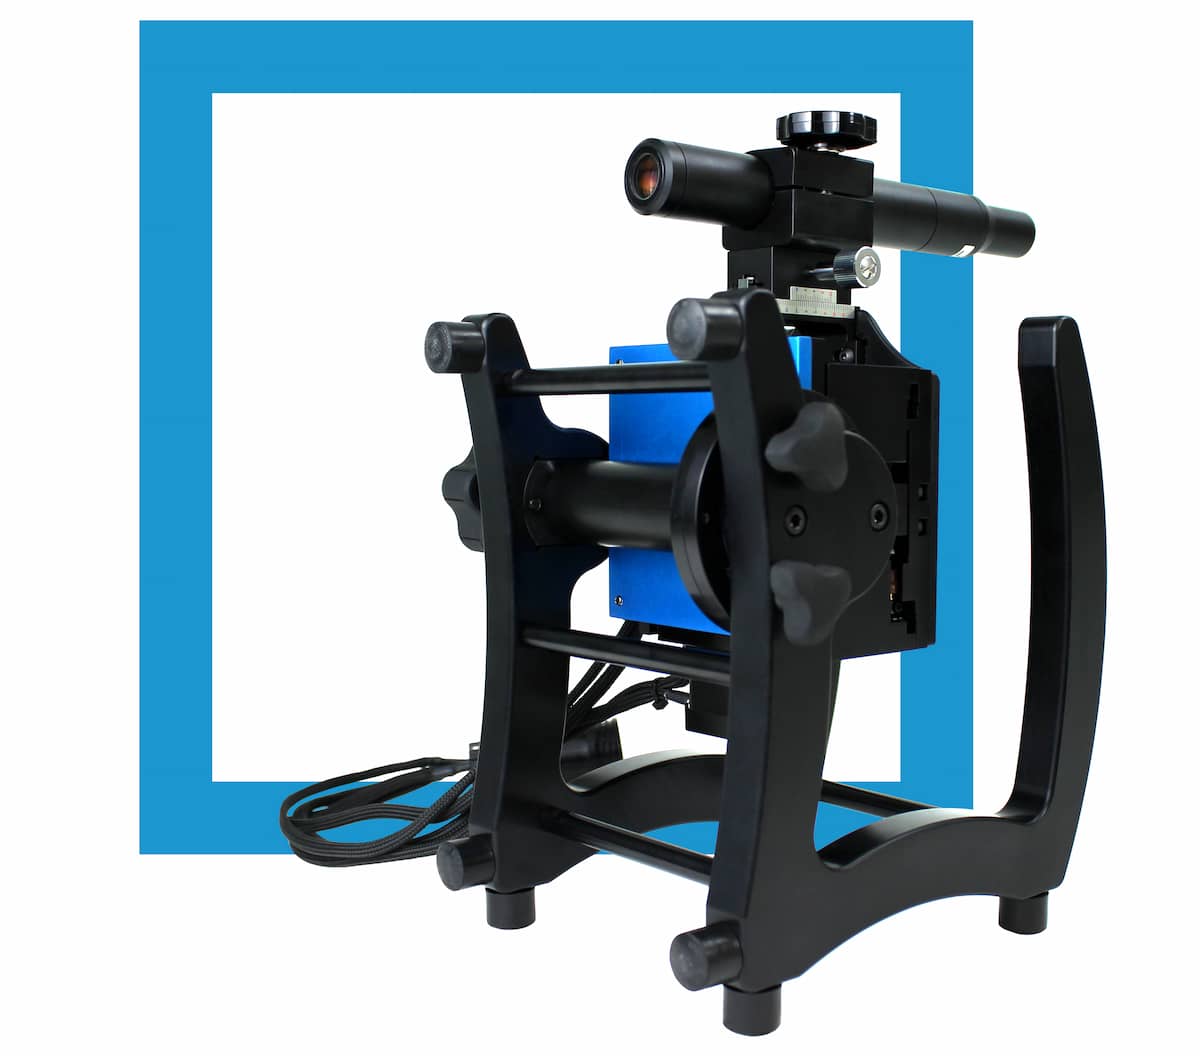
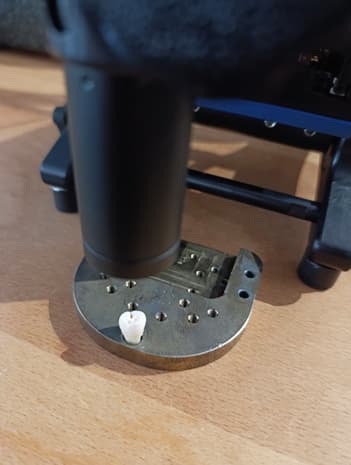
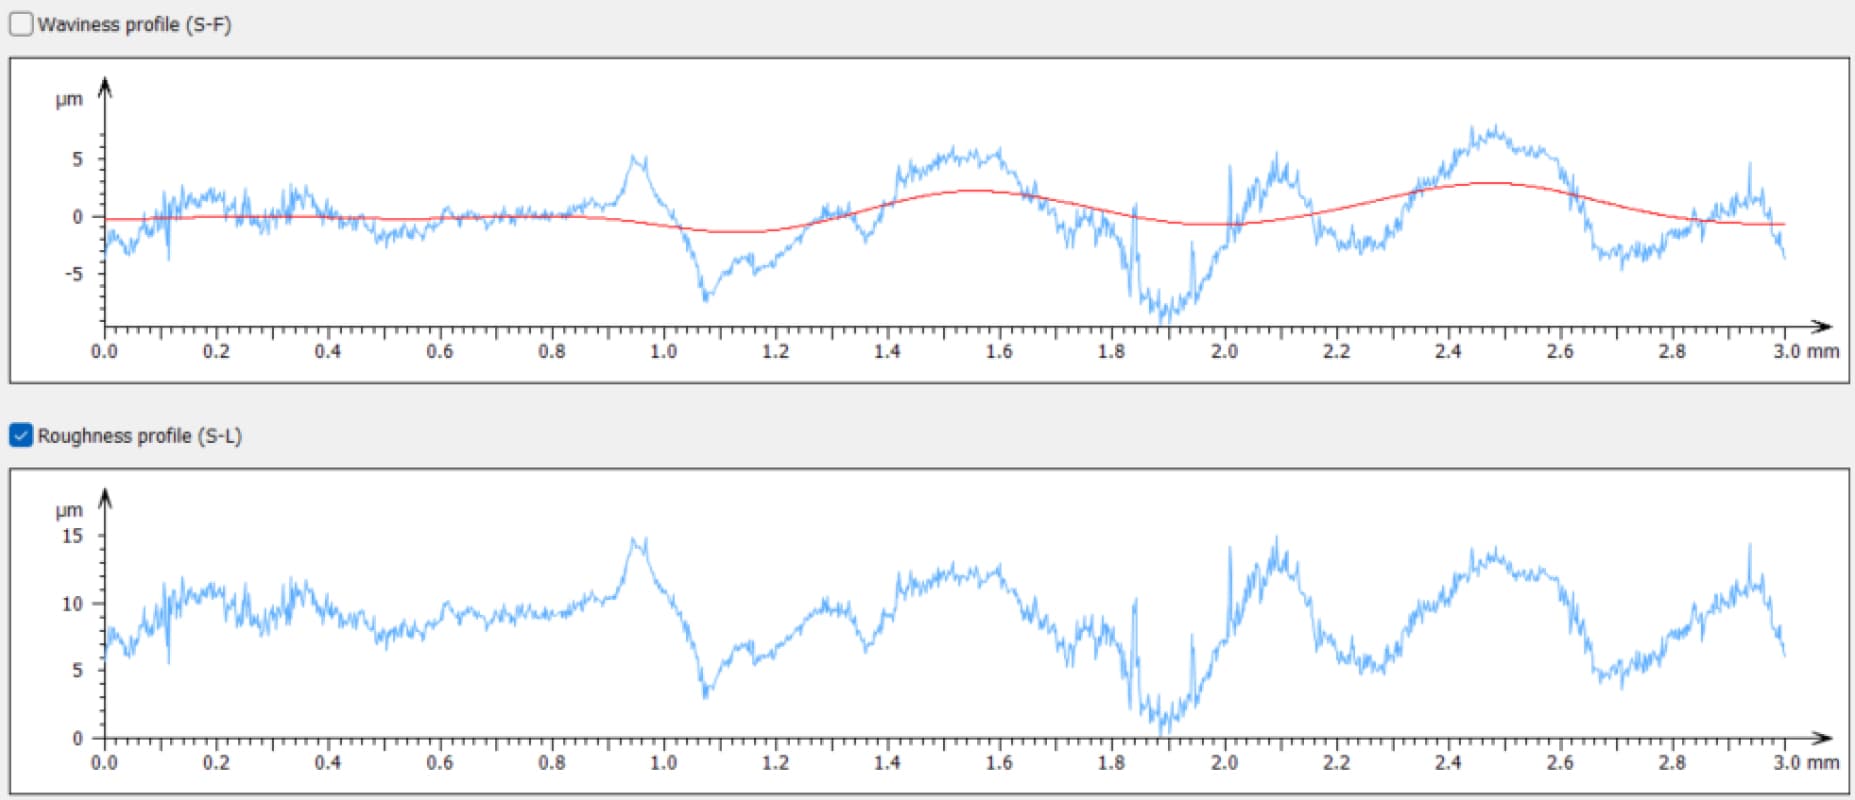
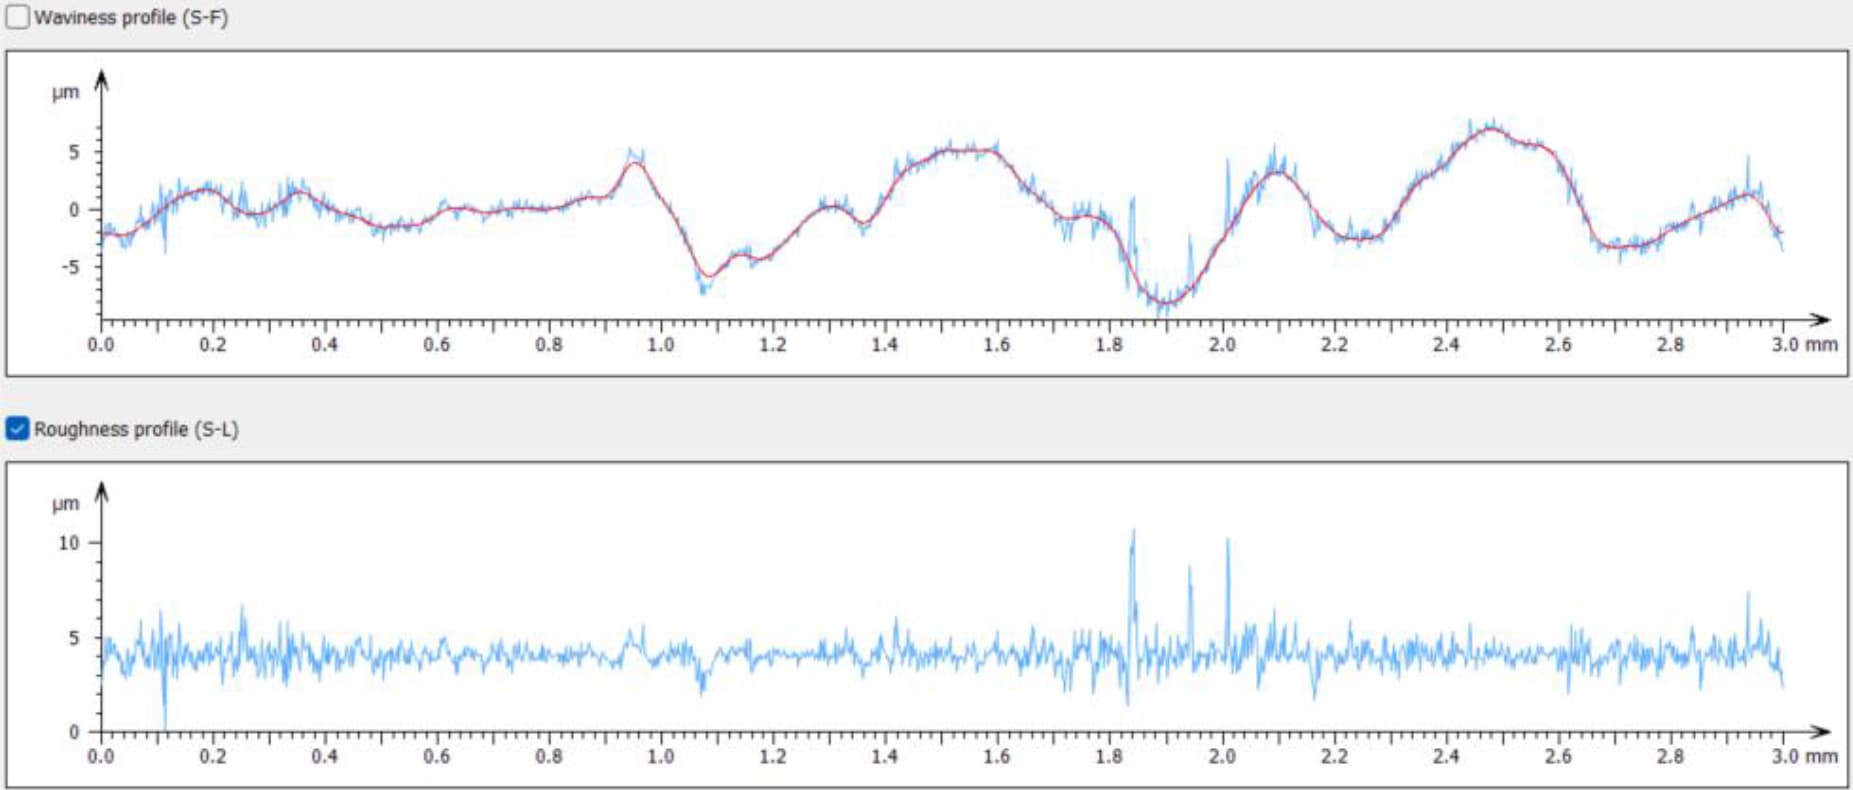
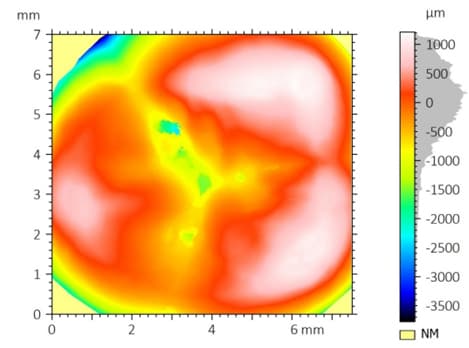
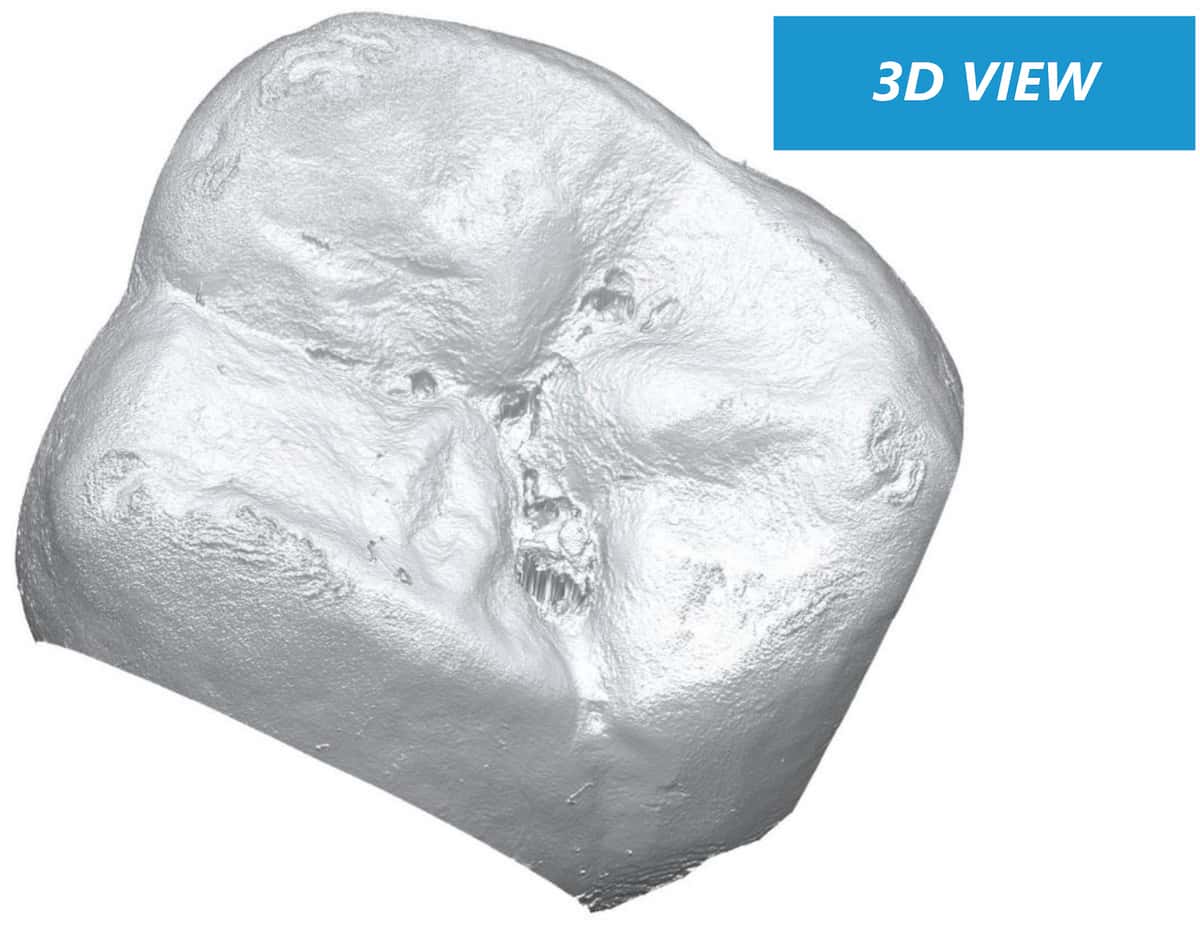
To improve coating adhesion, stents are often designed with complex geometries. In this study, the polymer coating is located at the bottom of grooves within the stent mesh. This configuration presents a significant challenge for adhesion measurement.

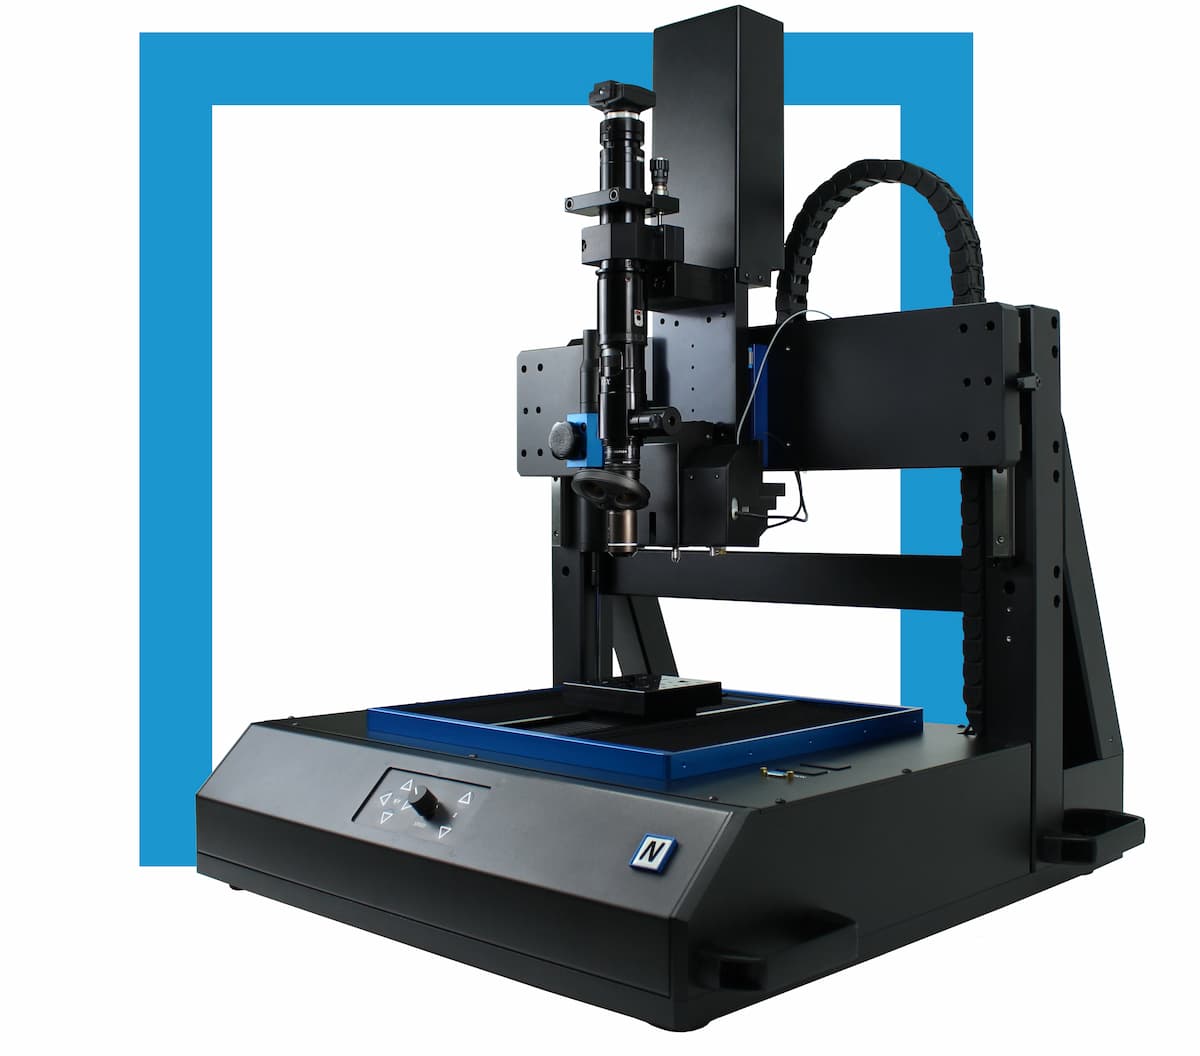
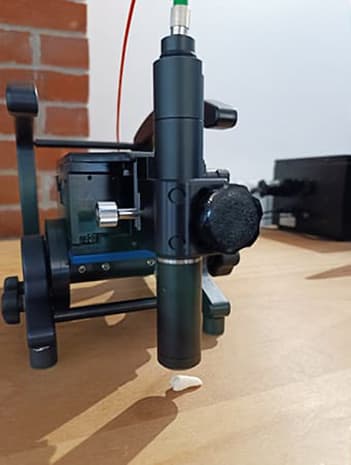
A reliable method is required to quantitatively evaluate the interfacial strength between the polymer coating and the metal substrate. The small diameter of the stent mesh, comparable to a human hair, combined with its three-dimensional geometry, requires:

  • ultrafine X-Y positioning accuracy
  • precise control of applied load
  • accurate depth measurement during testing

Measurement Method

Nano scratch testing is performed using the NANOVEA PB1000 Mekanik Test Cihazı, in Nano Scratch Mode, to evaluate the cohesive and adhesive strength of the polymer coating on the metal mesh of stent samples.

Controlled scratch measurements are carried out on stent geometries with dimensions comparable to a human hair, enabling precise evaluation of coating adhesion on complex stent structures.

NANOVEA PB1000 Advanced

Mekanik Test Cihazı

Test Koşulları

1. Regular Stent Samples

The stent is fixed on the sample stage, with a support wire inserted inside the stent tube to ensure stability during nano scratch testing. The NANOVEA Mechanical Tester is used to perform nano scratch measurements using the parameters summarized in Table 1, to evaluate the cohesive and adhesive strength of the polymer coating on the metal substrate.

ParameterValue
Load typeİlerici
Initial load0.05 mN
Final load300 and 100 mN
Sliding speed0.5 mm/min
Sliding distance0.5 mm
Indenter geometryKonik
Indenter material (tip)Elmas
Girinti ucu yarıçapı20 µm
Sıcaklık24°C (room)

Tablo 1: Test parameters for nano scratch measurements on regular stent samples

2. Grooved Stent Samples

The SEM image in Fig. 1 shows the cross-section of the stent sample. The stent features a groove with a depth of approximately 30 µm. The polymer coating, with a thickness of 10.8 µm, is located at the bottom of the groove.

Standard 60° conical diamond tips are not sharp enough to reach the bottom of the groove without contacting the sidewalls. Therefore, a sharper 40° conical diamond tip is used in this study (Fig. 2).

Nano scratch measurements are performed using the parameters summarized in Table 2.

Parameter Value
Load type İlerici
Initial load 0.1 mN
Final load 300 mN
Yükleme oranı 300 mN/min
Scratch length 0.25 mm
Scratch speed 0.25 mm/min
Indenter geometry 40° cone
Indenter material (tip) Elmas
Girinti ucu yarıçapı 5 µm

Table 2: Test parameters for nano scratch measurements on grooved stent samples

stent groove cross section polymer coating thickness adhesion analysis nano scratch testing

Fig. 1: SEM cross-section of a grooved stent showing polymer coating located at the bottom of the groove, highlighting the challenge of coating adhesion measurement in recessed geometries.

nano scratch diamond tip 40 degree stent groove coating adhesion testing schematic

Fig. 2: Schematic of a 40° conical diamond tip designed for nano scratch testing inside stent grooves, enabling accurate adhesion measurement without sidewall interference.

Sonuçlar ve Tartışma

The stent mesh has a diameter of approximately 100 μm, comparable to a human hair. Precise positioning is therefore critical to ensure the scratch test is performed at the center of the stent mesh. The NANOVEA Mechanical Tester provides X–Y positioning accuracy down to 0.25 μm, enabling accurate test placement under the integrated optical microscope.

1. Regular Stent Samples

Nano scratch testing is performed with a progressively increasing load up to 300 mN. The full scratch track on the stent is shown in Fig. 3a, while failure behavior at different stages is presented in Fig. 3b and 3c.

Two critical loads are identified:

  • Lc1: the load at which the first visible damage appears on the coating
  • Lc2: the load at which the coating is fully removed and the substrate is exposed

The evolution of coefficient of friction (COF) and penetration depth is shown in Fig. 4, providing insight into the progression of coating failure during the test.

The first signs of coating damage appear at Lc1 ≈ 14.5 mN. As the applied load increases, the diamond tip progressively penetrates the polymer coating, resulting in a wider and deeper scratch track. During this phase, the COF increases from approximately 0.05 to 0.7.

At Lc2 ≈ 78.1 mN, the coating is fully delaminated from the metal substrate. Beyond this point, as the load continues to increase, both COF and penetration depth remain relatively stable due to the mechanical support of the underlying metal substrate.

nano scratch track stent coating progressive load adhesion testing

(a) Full Scratch Track

(b) Lc1 ≈ 14.5 mN

stent coating delamination lc2 nano scratch 78.1 mN adhesion testing

(c) Lc2 ≈ 78.1 mN

Fig. 3: Nano scratch track on a stent coating under progressively increasing load, showing (a) full scratch path, (b) initial coating failure at Lc1 ≈ 14.5 mN, and (c) complete coating delamination at Lc2 ≈ 78.1 mN.

nano scratch testing stent coating coefficient of friction depth progression adhesion failure

Fig. 4: Evolution of coefficient of friction (COF) and penetration depth during nano scratch testing of a stent coating under progressively increasing load, showing the progression of coating failure and transition to substrate support.

Failures during nano scratch testing up to a maximum load of 300 mN occur at critical loads below 100 mN. To enable a more quantitative comparison of coating performance, additional tests are performed with a maximum load of 100 mN on two stent samples, referred to as Sample 1 and Sample 2.

Fig. 5 compares the scratch tracks of Sample 1 and Sample 2 after nano scratch testing. Sample 1 exhibits the first sign of coating damage at a critical load of Lc1 ≈ 13.2 mN, while Sample 2 shows initial failure at a higher load of Lc1 ≈ 21.1 mN.

Coating delamination occurs at 62.5 mN for Sample 1. In contrast, the coating on Sample 2 remains intact throughout the test, continuing to protect the metal substrate under the same loading conditions.

This behavior is further reflected in the evolution of coefficient of friction (COF) and penetration depth, as shown in Fig. 6. When the diamond tip penetrates through the coating and contacts the metal substrate in Sample 1, the COF reaches a peak while the penetration depth decreases due to the increased stiffness of the underlying substrate.

stent coating sample 1 early failure nano scratch track delamination adhesion testing

(a) Sample 1 – Early Coating Failure

stent coating sample 2 high adhesion nano scratch track minimal damage testing

(b) Sample 2 – Improved Coating Integrity

Fig. 5: Comparison of nano scratch tracks for two stent coatings, showing (a) early coating failure and delamination in Sample 1, and (b) improved coating integrity in Sample 2 under the same loading conditions.

nano scratch testing stent coating COF depth comparison sample 1 sample 2 adhesion performance

Fig. 6: Comparison of coefficient of friction (COF) and penetration depth for Sample 1 and Sample 2 during nano scratch testing, showing earlier substrate contact and higher friction response in Sample 1, indicating weaker coating adhesion.

2. Grooved Stent Samples

As shown in Fig. 1 and Fig. 7, the grooved stent mesh has a diameter of approximately 90 μm, comparable to a human hair. The groove has a width of ~50 μm and a depth of 30 μm. This geometry presents a significant challenge for nano scratch testing, particularly for evaluating coating adhesion at the bottom of the groove.

Precise positioning is critical to locate the scratch test within the groove. The nano scratch test is performed with a progressively increasing load up to 300 mN. The full scratch tracks of grooved stent Samples 3 and 4 are compared in Fig. 7.

The critical load Lc is defined as the load at which the coating fails and the substrate becomes exposed. The evolution of normal load and penetration depth, shown in Fig. 8, provides further insight into the progression of coating failure during testing.

As the applied load increases, the diamond tip progressively penetrates the polymer coating, resulting in a deeper scratch track. When the critical load Lc is reached, the coating delaminates from the metal substrate.

Sample 3 exhibits coating failure at Lc ≈ 126 mN, while Sample 4 fails at a higher load of Lc ≈ 173 mN. This difference indicates stronger adhesion of the coating in Sample 4.

The measured critical loads enable quantitative comparison of coating adhesion performance. Under the same testing conditions, the coating on Sample 4 demonstrates higher resistance to delamination, making it the better-performing candidate in this study.

stent groove coating failure sample 3 nano scratch 126 mN adhesion testing

(c) Sample 3 – Coating Failure in Groove (Lc ≈ 126 mN)

stent groove coating adhesion sample 4 nano scratch 173 mN minimal failure testing

(d) Sample 4 – Higher Adhesion in Groove (Lc ≈ 173 mN)

Fig. 7: Nano scratch tracks inside stent grooves for Samples 3 and 4, showing (c) coating failure at Lc ≈ 126 mN in Sample 3 and (d) higher adhesion with delayed failure at Lc ≈ 173 mN in Sample 4.

(a) Sample 3 – Earlier Coating Failure (Lc ≈ 126 mN)

(b) Sample 4 – Delayed Failure and Higher Adhesion (Lc ≈ 173 mN)

Fig. 8: Evolution of normal load and penetration depth during nano scratch testing inside stent grooves for Samples 3 and 4, showing earlier coating failure in Sample 3 and delayed failure at higher load in Sample 4. The vertical green line indicates the critical load (Lc) where coating delamination occurs.

Sonuç

This study demonstrates the ability of the NANOVEA Mechanical Tester to quantitatively evaluate the cohesive and adhesive strength of polymer coatings on both regular and grooved stent geometries using nano scratch testing.

The recessed geometry of the stent grooves, approximately 50 μm wide and 30 μm deep, presents a significant challenge for coating adhesion measurement. The high X–Y positioning accuracy of 0.25 μm enables precise placement of the scratch test within these confined regions, allowing direct evaluation of coating performance where failure is most critical.

By applying a controlled, progressively increasing load, critical loads associated with coating failure can be identified and compared across samples. This approach enables reliable differentiation of coating adhesion performance and interfacial integrity, even on small, complex stent structures.

Referanslar

[I] http://www.nhlbi.nih.gov/health/health-topics/topics/stents
[II] http://www.scielo.org.mx/scielo.php?script=sci_arttext&pid=S1405-99402006000300008

Frequently Asked Questions About Stent Coating Adhesion Testing

What is stent coating adhesion testing?

Stent coating adhesion testing evaluates how strongly a polymer coating is bonded to the metal substrate of a stent. Techniques such as nano scratch testing quantify the load at which coating damage and delamination occur, providing measurable indicators of adhesion strength.

What is critical load (Lc) in nano scratch testing?

Critical load (Lc) is the applied load at which a coating fails during a scratch test.

  • Lc1 corresponds to the first visible damage in the coating
  • Lc2 indicates complete coating removal and exposure of the substrate

These values are used to quantify and compare coating adhesion performance.

Why is coating adhesion important in drug-eluting stents?

Coating adhesion directly affects the reliability of drug-eluting stents. Poor adhesion can lead to coating delamination, which may compromise controlled drug release and increase the risk of device failure.

How do you measure coating adhesion inside stent grooves?

Measuring adhesion inside stent grooves requires high positioning accuracy and appropriate indenter geometry. Nano scratch testing with sharp diamond tips allows access to recessed coating regions, enabling direct evaluation of adhesion within complex stent geometries.

What does coefficient of friction (COF) indicate in scratch testing?

The coefficient of friction (COF) reflects changes in surface interaction during the scratch test. A sudden increase in COF often indicates coating failure and contact between the indenter and the underlying metal substrate.

How can nano scratch testing compare different coating formulations?

Nano scratch testing enables direct comparison of coatings by measuring critical loads under controlled conditions. Higher critical loads indicate stronger adhesion and improved resistance to delamination, allowing selection of better-performing coating systems.

Dentist holding dental model for tooth surface roughness analysis and 3D reconstruction

Dental Surface Roughness Measurement & 3D Tooth Topography

Application Note | Dental Surface Characterization

Dental Surface Roughness Measurement and Full 3D Tooth Topography

Surface Roughness Analysis Using Non-Contact Optical Profilometry

Dental surface roughness measurement and 3D molar reconstruction using optical profilometry

Tarafından hazırlanmıştır

Walter Alabiso, PhD; Davide Morrone, MPhys; Andrew Shore, MA

Giriş

The ability to accurately characterize tooth surfaces, including micro-roughness and 3D surface topography at the nanometer scale, enables advanced research and applications in orthodontics and dental materials science. Non-contact optical profilometry provides a precise method for measuring dental surface roughness and analyzing tooth surface morphology without damaging delicate structures. These measurements support the development of composite dental materials that replicate the natural surface roughness of enamel, as well as the design and fabrication of patient-specific dental casts and restorative components.

Low surface roughness plays a primary role in limiting bacterial adhesion and plaque formation, thereby reducing the risk of cavities. An increase in average roughness (Ra) above 2 µm leads to a steep increase in biofilm formation in vivo.¹ An Ra of 0.2 µm is considered the threshold value below which no further reduction in bacterial adhesion can be expected.²

Reconstruction of the tooth’s 3D surface topography enables the fabrication of dental casts, which are essential for accurate diagnosis, treatment planning, and the fabrication of dental appliances.

Non-Contact Optical Profilometry for Dental Surface Analysis

The present study illustrates the potential of NANOVEA’s high-precision non-contact optical profilometers for dental surface roughness measurement and 3D tooth topography analysis. Chromatic Light technology offers significant advantages over classical touch probe techniques. It acquires data points from deep crevices and complex geometries without introducing measurement errors or artifacts caused by local plastic deformation and without requiring extensive data manipulation.

Compared to focus variation systems, single-point optical sensing provides superior lateral and height accuracy, with X/Y resolution below 0.5 µm, maximum vertical resolution of 1.9 nm, and the ability to measure surface angles up to 87°. The technique is effective on transparent, opaque, specular, diffusive, polished, and rough dental surfaces, making it well suited for comprehensive dental surface characterization.

Measurement Method

Bu uygulamada NANOVEA JR25 Non-Contact Optical Profiler was used to analyze the surface roughness and 3D surface topography of an adult human molar previously affected by tooth decay. The side of the tooth was scanned using a PS2–MG140 single-point optical sensor to measure surface roughness parameters over a defined region of interest and along multiple line profiles.

The crown of the tooth was then scanned and reconstructed using a PS5–MG35 single-point optical sensor, which is suited for larger-area acquisition and full 3D tooth topography measurement.


NANOVEA JR25 Portable
Optik Profilometre

Surface Measurement Using NANOVEA Optical Profilometer

Surface roughness measurements were performed on the lateral side of the molar crown, followed by full 3D reconstruction of the crown surface. Separate single-point optical sensors were used to optimize measurement accuracy for both localized roughness analysis and large-area surface topography acquisition.

PS2 – MG140

Surface roughness analysis by area and parallel line profiles on the side of the tooth’s crown.

PS5 – MG35

Full 3D surface reconstruction of the tooth’s crown.

Ölçüm Parametreleri

The following measurement parameters were used for localized surface roughness analysis and full 3D surface reconstruction of the molar crown using NANOVEA single-point optical sensors.

ParameterRoughness Analysis (Area)Roughness Analysis (Profiles)Full 3D Reconstruction
Optical PenPS2-MG140PS2-MG140PS5-MG35
Z-Range [µm]30030010000
X-Distance [mm]2.003.007.50
X-Step Size [µm]1.701.7010.00
Y-Distance [mm]2.001.007.00
Y-Step Size [µm]1.70100.0010.00
Average (Avg)111
Measurement TypeDirectDirectDirect
Acquisition ModeSingle FrequencySingle FrequencyDouble Frequency
Acquisition Rate [Hz]200200100–400
Light Intensity [%]100100100

Optical Profilometry Results

Surface Roughness Analysis (Area)

The PS2 single-point optical sensor was used to investigate fine surface features on the side of the tooth. The image below shows a false-color 2D surface map of the scanned region obtained by non-contact optical profilometry.

False-color 2D height map of scanned tooth surface region

A least-squares degree-8 polynomial form removal was applied to isolate the surface roughness component. The roughness filters S-Gaussian 2.5 µm and L-Gaussian 0.8 mm were then applied according to ISO 25178. The resulting filtered surface and corresponding roughness parameters are presented below.

ISO 25178 – Roughness (S-L)
S-filter (λs): Gaussian, 2.5 µm
F: [Workflow] Form removed (LS-poly 8)
L-filter (λc): Gaussian, 0.8 mm
Height Parameters
Sq2.433µmKök ortalama kare yüksekliği
Ssk-0.102 Çarpıklık
Sku3.715 Kurtosis
Sp18.861µmMaksimum tepe yüksekliği
Sv16.553µmMaximum pit depth
Sz35.414µmMaksimum yükseklik
Sa1.888µmAritmetik ortalama yükseklik

The average surface roughness Sa is 1.888 µm, while the peak-to-valley height Sz reaches 35.414 µm.

A 3D surface rendering of the filtered area is shown below for visualization.

3D rendering of ISO 25178 filtered tooth surface roughness

Roughness Analysis (Profiles)

Surface roughness profiles were measured using a series of 11 parallel line scans along the X direction on the side of the tooth. The false-color 2D surface map of the raw scan is shown below.

False-color 2D raw scan of tooth surface for line roughness profiles

The surface form was removed using a least-squares 8-degree polynomial prior to applying the metrological filters, leaving the residual surface shown below.

A statistical analysis of the measured surface roughness profiles reveals the following line roughness parameters.

Overlay of multiple tooth surface roughness profiles for statistical analysis

ISO 4287 – Roughness (S-L)
F: Hiçbiri
S-filter (λs): Gaussian, 2.5 µm
L-filter (λc): Gaussian, 0.8 mm
Evaluation length: All λc (3)
Amplitude Parameters – Roughness Profile
  DescriptionMeanStd devMinMax
RpµmMaximum peak height of the roughness profile5.6830.7614.3156.610
RvµmMaximum valley depth of the roughness profile6.2421.0094.7018.438
RzµmMaximum height of roughness profile11.9251.6769.12315.048
RaµmArithmetic mean deviation of the roughness profile2.0630.2971.7102.629
RqµmRoot-mean-square (RMS) deviation of the roughness profile2.5230.3612.0573.175

ISO 4287 – Roughness (S-L)
F: Hiçbiri
S-filter (λs): Gaussian, 2.5 µm
L-filter (λc): Gaussian, 0.8 mm
Evaluation length: All λc (3)
Amplitude Parameters – Roughness Profile
Rpµm
Maximum peak height of the roughness profile
Mean5.683
Std dev0.761
Min4.315
Max6.610
Rvµm
Maximum valley depth of the roughness profile
Mean6.242
Std dev1.009
Min4.701
Max8.438
Rzµm
Maximum height of roughness profile
Mean11.925
Std dev1.676
Min9.123
Max15.048
Raµm
Arithmetic mean deviation of the roughness profile
Mean2.063
Std dev0.297
Min1.710
Max2.629
Rqµm
Root-mean-square (RMS) deviation of the roughness profile
Mean2.523
Std dev0.361
Min2.057
Max3.175

The value of Ra is consistent with the Sa value extracted from the surface area measurement.

Different metrological filters can be applied to distinguish between macroscopic waviness and microscopic surface roughness. For example, a coarser filter cut-off, such as the 8 mm cut-off used with the Robust Gaussian order-2 filter, produces a smoother waviness profile (red) that is less sensitive to sharp local variations and follows the original surface profile more loosely.

Comparison of waviness and roughness profiles on tooth surface using coarse filter

Alternatively, a finer cut-off (e.g., 0.08 mm) enables the analysis of micro-roughness by removing the waviness component that follows the original profile at a larger scale, leaving the finer surface roughness features of the tooth visible.

The microroughness analysis obtained using a 0.08 mm L-Gaussian filter is presented below.

Final microroughness profile of tooth surface after filtering

ISO 4287 – Roughness (S-L)
F: Hiçbiri
S-filter (λs): Gaussian, 2.5 µm
L-filter (λc): Gaussian, 0.08 mm
Evaluation length: All λc (37)
Amplitude Parameters – Roughness Profile
  DescriptionMeanStd devMinMax
RpµmMaximum peak height of the roughness profile1.5820.1221.3421.748
RvµmMaximum valley depth of the roughness profile1.4660.1191.2541.661
RzµmMaximum height of roughness profile3.0490.1962.8203.409
RaµmArithmetic mean deviation of the roughness profile0.4950.0470.4230.597
RqµmRoot-mean-square (RMS) deviation of the roughness profile0.6430.0560.5620.762

ISO 4287 – Roughness (S-L)
F: Hiçbiri
S-filter (λs): Gaussian, 2.5 µm
L-filter (λc): Gaussian, 0.8 mm
Evaluation length: All λc (3)
Amplitude Parameters – Roughness Profile
Rpµm
Maximum peak height of the roughness profile
Mean5.683
Std dev0.761
Min4.315
Max6.610
Rvµm
Maximum valley depth of the roughness profile
Mean6.242
Std dev1.009
Min4.701
Max8.438
Rzµm
Maximum height of roughness profile
Mean11.925
Std dev1.676
Min9.123
Max15.048
Raµm
Arithmetic mean deviation of the roughness profile
Mean2.063
Std dev0.297
Min1.710
Max2.629
Rqµm
Root-mean-square (RMS) deviation of the roughness profile
Mean2.523
Std dev0.361
Min2.057
Max3.175

Full 3D Tooth Surface Topography Reconstruction

The extended Z-scan range of the PS5 optical sensor enables high-fidelity scanning of the entire tooth crown surface. The resulting 3D surface topography is shown below.

False-color surface topography map of full tooth crown measured with optical profilometer

2D VIEW: 2D surface map of the tooth crown measured with optical profilometry

3D surface reconstruction of molar crown from optical profilometer scan

3D VIEW: High-fidelity 3D rendering of the molar crown surface obtained with optical profilometry

Sonuç

In this application, the NANOVEA JR25 Non-Contact Optical Profiler was used to measure the surface roughness and 3D surface topography of an adult human molar.

Both the area scan and the line profile analysis revealed a roughness Rq of approximately 2.5 µm and an Ra of about 1.9–2.0 µm. These values are consistent with results reported in the literature.³ The use of a narrower L-Gaussian filter with an 80 µm cut-off enabled further investigation of micro-roughness, revealing an Rq of 0.643 µm and an Ra of 0.495 µm.

The full 3D surface topography of the molar crown was reconstructed with high fidelity. The high measurement resolution allows detection of fine surface features and crevices. The resulting surface data can be easily processed and exported as STL files, enabling the design and fabrication of customized dental devices and restorative components.

Referanslar

[1] Shin, B.W., et al. Surface Roughness of Prefabricated Pediatric Zirconia Crowns Following Simulated Toothbrushing. Pediatric Dentistry 44.5 (2022): 363–367.
[2] Bollen, C.M.L., Paul Lambrechts, and Marc Quirynen. Comparison of surface roughness of oral hard materials to the threshold surface roughness for bacterial plaque retention: A review of the literature. Dental Materials 13.4 (1997): 258–269.
[3] Suputtamongkol, K., et al. Surface roughness resulting from wear of lithia-disilicate-based posterior crowns. Wear 269.3–4 (2010): 317–322.

Frequently Asked Questions About Dental Surface Roughness Measurement

What is dental surface roughness measurement?

Dental surface roughness measurement quantifies the microscopic texture of tooth surfaces using parameters such as Ra, Rq, and Sa. Optical profilometers measure these features without contacting the surface, allowing accurate analysis of enamel, restorative materials, and dental crowns.

Why use optical profilometry to measure tooth roughness?

Optical profilometry provides non-contact surface measurement with nanometer-scale vertical resolution. It captures 2D surface maps and full 3D surface topography of dental structures without damaging soft or polished surfaces.

What roughness parameters are used for dental surface analysis?

Common roughness parameters include Ra (arithmetic mean roughness), Rq (root mean square roughness), Sa (areal roughness), and Sz (maximum surface height). These parameters help evaluate enamel wear, plaque adhesion risk, and the performance of restorative materials.

Why is surface roughness important in dentistry?

Surface roughness affects plaque retention, wear resistance, and the long-term performance of dental restorations. Controlling micro-roughness can reduce bacterial adhesion and improve the durability of dental materials.

Need Reliable Surface Roughness Measurement for Dental Materials?